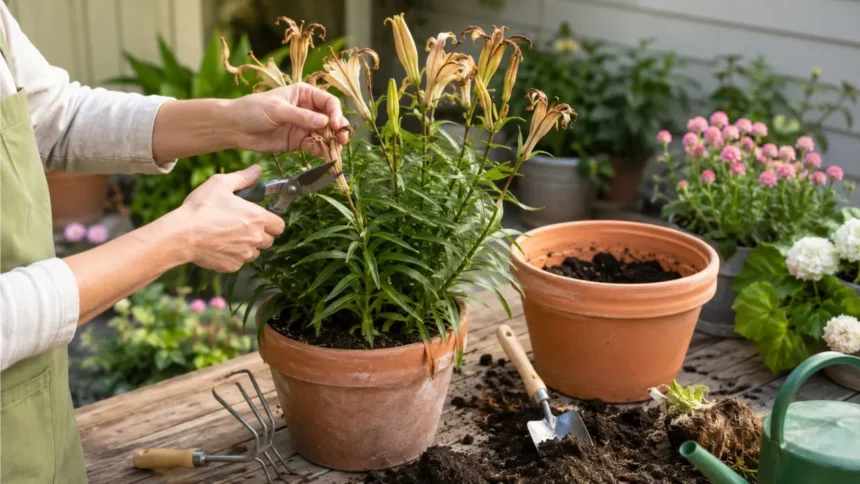
What to Do With Lilies in Pots After Flowering
When the last lily flower fades, it may look as though the plant has finished its useful life. However, the green stems and leaves are still performing an important job beneath the surface. They collect sunlight and use that energy to replenish the bulbs for next year’s growth and flowers.
The most important rule is not to cut the entire plant down immediately after blooming. Remove the faded flower heads, but leave the leafy stems standing until they turn yellow and die back naturally. Cutting green foliage too early can leave the bulbs weaker and reduce future flowering.
Continue watering potted lilies while their leaves remain green, but avoid leaving the compost constantly saturated. You can also continue feeding for several weeks after flowering to help the bulbs rebuild their reserves. Once the foliage begins dying naturally, gradually reduce both watering and feeding.
After the stems have completely yellowed, you can cut them down and decide whether to leave the bulbs in their pot, repot them or plant them in the garden. The best option depends on the container size, drainage, lily variety and winter temperatures in your area.
Key Takeaways
Deadhead potted lilies as soon as their flowers fade. Cut off the spent flower and developing seed pod, but keep as much of the green stem and foliage as possible. This prevents the bulb from wasting energy on seeds while allowing the leaves to continue feeding it.
Keep the compost moderately moist while the foliage remains green. Water when the upper layer begins to feel dry, allowing the excess to drain from the bottom. Lilies dislike being left completely dry during active growth, but waterlogged compost can cause bulb rot.
Continue applying an appropriate liquid fertilizer every couple of weeks while the plant is still actively growing. Stop feeding when the leaves begin to yellow and the lily starts entering dormancy. The plant cannot use regular fertilizer effectively once active growth has ended.
Cut the stems down only when they have become yellow or brown. You may then keep the dormant bulbs in a protected container, refresh the compost, move them to a larger pot or plant them in well-drained garden soil.
This Guide Covers True Lilies
This after-flowering advice primarily applies to true lilies in the botanical genus Lilium. Common examples include Asiatic lilies, Oriental lilies, trumpet lilies, tiger lilies and Easter lilies. These plants grow from bulbs and usually produce tall leafy stems with several large flowers.
Several unrelated plants contain “lily” in their common names but require different care. Peace lilies are tropical evergreen houseplants, while daylilies grow from fleshy roots and produce grass-like leaves. Their after-flowering routines are not the same as those of true potted lilies.
Calla lilies grow from rhizomes rather than true lily bulbs. Many calla varieties require a distinct dry dormancy period, particularly in regions with cold winters. Water lilies are aquatic plants and follow an entirely different seasonal care routine.
Check the plant label when you are unsure which lily you own. A true lily generally has a single upright stem with narrow leaves arranged along it. Correct identification prevents you from applying dormancy or pruning advice intended for another plant.
Step 1: Deadhead the Faded Lily Flowers
Deadheading means removing flowers after they have faded. Once each bloom becomes wilted, brown or damaged, cut it off using clean scissors or secateurs. Make the cut just beneath the flower head without removing a large section of leafy stem.
After pollination, a lily may begin forming a swollen seed pod behind the flower. Seed production uses energy that could otherwise return to the bulb. Removing the fading flower and seed pod helps direct the plant’s resources toward strengthening the underground bulb.
Avoid pulling the flower head roughly because the stem may bend or split. Support the stem with one hand while making a clean cut with the other. Clean tools reduce the likelihood of spreading fungal or bacterial problems between plants.
If you want to collect lily seeds, you can deliberately leave one or more seed pods in place. However, growing lilies from seed is slow, and the young plants may take several years to flower. Most home gardeners will achieve faster results by conserving the bulb’s energy.
Step 2: Leave the Green Stems and Leaves Alone
The foliage continues photosynthesizing after the flowers have finished. Through this process, the plant converts light into energy and stores some of that energy in the bulb. These reserves support root growth, new stems and flower buds during the following season.
Cutting green leaves may make the container look tidier, but it interrupts this rebuilding process. A bulb with insufficient stored energy may produce weaker growth, fewer flowers or no flowers the following year. Leave the foliage attached for as long as it remains naturally green.
Do not tie the stems into knots or bend the leaves down to hide them. Damaging or restricting the foliage reduces the surface available for photosynthesis. Move the container to a less noticeable but still bright position when the untidy appearance becomes distracting.
You may remove individual leaves that are completely brown, diseased or broken. Keep all healthy green foliage intact until natural dieback begins. This simple step has one of the greatest effects on whether your potted lilies return successfully.
Step 3: Keep the Pot in Good Light
Continue placing the lilies in a bright position after flowering. The leaves require light to manufacture the carbohydrates that replenish the bulbs. Moving the pot into a dark garage or shed while the foliage is green will weaken this process.
Outdoor lilies generally perform well in a sunny or lightly shaded position. Strong afternoon heat can dry small pots quickly, so monitor the compost carefully. The container may benefit from morning sunlight and some protection from the hottest part of the day.
Lilies displayed indoors during flowering should receive bright light near a suitable window afterward. When outdoor conditions are mild and the danger of severe frost has passed, the pot may be gradually moved outside. Introduce stronger sunlight over several days to prevent leaf scorch.
Do not place an indoor-grown lily suddenly in intense midday sun. Its softer leaves may not yet be adapted to outdoor light, wind and temperature changes. A gradual transition helps the plant continue growing without unnecessary stress.
Step 4: Continue Watering While the Leaves Are Green
Potted lilies still require water after flowering because their leaves and roots remain active. Check the compost regularly and water when its upper layer begins to feel dry. Apply enough water to moisten the root zone and allow the excess to escape through the drainage holes.
Container compost dries faster than garden soil, especially during warm or windy weather. Small pots may need checking every day during hot conditions. However, watering on a fixed schedule can cause problems because temperature, pot size and compost type affect drying speed.
Do not leave the container sitting permanently in a saucer filled with water. Lily bulbs need moisture but also require oxygen around their roots. Constantly saturated compost encourages fungal decay and may cause the bulbs to become soft or rotten.
As the leaves turn yellow, the plant begins using less water. Gradually increase the time between waterings rather than suddenly flooding dormant compost. Once the foliage has died, keep the pot from becoming heavily waterlogged during the resting period.
Step 5: Feed the Bulbs After Flowering
Feeding after flowering can help potted lilies replace nutrients used during stem and flower production. Container compost contains a limited nutrient supply, and regular watering gradually carries some nutrients out through the drainage holes.
Use a balanced or high-potassium liquid fertilizer suitable for flowering plants. Apply it according to the product instructions rather than making an excessively strong mixture. Overfeeding can damage the roots and does not force the bulb to store unlimited energy.
Feeding every couple of weeks while the foliage remains healthy is sufficient for many potted lilies. Continue for several weeks after the final flowers fade, particularly when the plant still has strong green leaves. Always apply fertilizer to moist compost unless the label says otherwise.
Stop feeding once the foliage becomes yellow and active growth is ending. Dormant bulbs do not require repeated fertilizer applications. Unused mineral salts can build up in the compost and may damage the roots when growth begins again.
Step 6: Wait for the Foliage to Die Naturally
Lily leaves normally lose their green colour as the growing season ends. They may first become pale, then yellow and eventually brown. This process shows that the plant is transferring useful resources from its foliage back into the bulb.
The exact timing varies among lily types, flowering dates and climates. Some plants remain green for several weeks after blooming, while others begin declining sooner. Avoid using a fixed calendar date as your only guide.
You can test the stem once it looks completely brown and dry. A dead stem may pull away gently, although cutting it is usually safer than tugging at the bulb. If part of the stem remains green, allow it more time before removal.
Do not mistake sudden spotting, blackening or collapse for healthy seasonal dieback. Rapid deterioration can indicate disease, severe waterlogging or pest damage. Examine the plant carefully when the leaves decline unusually early.
Step 7: Cut Back the Dead Stems
Once the entire stem and its leaves are yellow or brown, cut it back with clean secateurs. Leave a short section above the compost so you can remember where the bulbs are located. Avoid cutting deeply into the soil.
Remove fallen leaves and flower debris from the surface of the container. Decaying plant material can hold moisture and provide shelter for pests or disease organisms. Dispose of visibly diseased foliage rather than adding it to an ordinary home compost pile.
Clean your cutting tools before moving to another plant. This is especially important when the lily showed spots, mould or stem damage. Washing and disinfecting tools can reduce the transfer of problems around your garden.
After cutting the stem, the container may appear empty, but living bulbs remain beneath the compost. Label the pot with the lily variety and colour if possible. A clear label prevents accidental digging or disposal during winter.
Should You Leave Lily Bulbs in Their Pots?
Lily bulbs can remain in a sufficiently large, well-drained container for another growing season. This is often the easiest option when the plants were healthy and flowered well. Protect the pot from prolonged waterlogging and severe freezing conditions.
A cramped container may hold too many bulbs or leave little room for fresh roots. The compost can also become compacted and depleted over time. Crowded lilies may produce smaller stems, fewer flowers and roots emerging through the drainage holes.
When the pot is large enough, remove and replace approximately the top few centimetres of old compost in autumn. Add fresh potting mix and an appropriate slow-release fertilizer or well-rotted organic material. Avoid damaging bulbs that sit close to the surface.
Repot completely when drainage has deteriorated, the compost smells sour or the bulbs are badly congested. Autumn after natural dieback is an appropriate time because the plant is no longer supporting active stems and flowers.
When to Repot Lilies After Flowering
Repot lilies after their foliage has died down, usually in autumn. Waiting until dormancy reduces damage to active stems and leaves. It also allows you to inspect the bulbs and refresh the compost before another growing season.
Choose a container that is deep enough for the bulbs and their roots. Tall lilies can become top-heavy, so a broad and stable pot helps prevent them from falling in wind. The new container must have clear drainage holes.
Use fresh, fertile and free-draining compost. Adding coarse material suitable for potting mixes may improve drainage when your chosen compost holds too much water. Avoid using dense garden soil alone because it can become compacted inside a container.
Handle lily bulbs carefully because they do not have the same thick, papery protective covering found on some other bulbs. Replant them promptly rather than leaving them exposed until they become dry. Discard bulbs that are completely soft, foul-smelling or badly rotten.
How to Repot Lily Bulbs Step by Step
Begin by tipping the dormant container gently onto its side. Support the root ball while sliding it out rather than pulling on old stems. Loosen the compost gradually so you can find the bulbs without cutting into them.
Separate crowded bulbs carefully, keeping as many healthy roots attached as possible. Small offset bulbs may be removed and grown separately, although they may need time to reach flowering size. Inspect everything for softness, mould or signs of pest damage.
Place fresh compost in the bottom of the cleaned pot and arrange the bulbs with their pointed ends upward. Space them so that roots can develop around each bulb. Cover them to an appropriate depth for the variety and container.
Water after repotting to settle the compost around the roots, then allow the excess to drain. During dormancy, avoid repeatedly soaking the pot. Resume more regular watering when fresh shoots begin emerging.
Can You Plant Potted Lilies in the Garden?
Healthy potted lilies can be transferred to the garden after flowering. Planting them in the ground gives the bulbs more room for their roots and can protect them from the rapid temperature changes experienced by small containers.
Wait until the foliage has died naturally if you are moving dormant bulbs in autumn. You may also plant a still-growing lily carefully, but protecting the root ball is important. Avoid breaking green stems that are continuing to feed the bulb.
Choose a sunny or partly shaded location with fertile, well-drained soil. Lilies dislike ground that remains saturated for long periods. Raised beds or improved drainage may be necessary when your garden has heavy, wet clay.
Plant the bulbs promptly and water the soil to settle it around them. Mark the area so you do not accidentally disturb the bulbs during winter or early spring. Add mulch for protection, but avoid creating a permanently wet layer directly over the bulb.
How to Overwinter Lilies in Pots
True lilies are generally hardy, but bulbs in containers experience colder conditions than those planted in the ground. Air reaches every side of the pot, allowing the compost and bulbs to freeze more deeply during harsh weather.
Move dormant pots to a sheltered position beside a wall, inside an unheated greenhouse or in another cool protected area. The location should remain cold enough for normal dormancy but should reduce exposure to hard freezes, wind and heavy winter rain.
You can wrap the container with insulating material or group several pots together. In very cold regions, sinking the container into the ground or transferring the bulbs into a garden bed may offer stronger protection.
Do not move dormant hardy lilies into a constantly warm living room. They benefit from a cool seasonal rest, and warm conditions may encourage weak growth too early. Protecting them from extremes is different from keeping them actively growing all winter.
Should Dormant Lily Bulbs Be Watered?
Dormant potted bulbs need far less water than actively growing lilies. Their leaves are no longer losing moisture, and cool weather slows evaporation. Excess winter watering is therefore a common cause of bulb rot.
Do not allow an outdoor container to collect repeated heavy rain without draining. Raise the pot on feet so water can escape and check that drainage holes remain open. A sheltered location can prevent winter storms from saturating the compost.
The compost does not necessarily need to become completely dust-dry for months. Check occasionally and provide a small amount of water if it becomes extremely dry, especially when the pot is stored under cover. Avoid soaking it repeatedly.
Begin increasing watering when new shoots emerge and active spring growth becomes visible. At that stage, the roots and stems need a more reliable moisture supply. Continue allowing excess water to drain after each application.
When Will Potted Lilies Grow Again?
New lily shoots usually emerge when temperatures and daylight increase during spring. The exact month depends on your climate, lily variety and storage conditions. Early growth may appear while nights are still cold.
Move sheltered containers back into stronger light as shoots develop. Resume regular watering and begin feeding after growth is established. Turn the pot occasionally when light reaches it mainly from one direction.
Protect tender new shoots from severe late frosts when necessary. Move portable pots temporarily under cover or use suitable horticultural protection overnight. Remove coverings during mild daylight conditions so the shoots receive light and air.
Do not assume a bulb is dead simply because it emerges later than another variety. Oriental, Asiatic and trumpet lilies may follow different schedules. Give dormant containers sufficient time before emptying them.
How to Help Potted Lilies Flower Again
Strong flowering begins with allowing the previous year’s foliage to complete its natural cycle. Bulbs that retained healthy leaves after flowering are more likely to have stored enough energy for another display.
Provide sufficient light during active growth and use fresh, free-draining compost. Begin feeding once the stems are growing strongly, following the fertilizer instructions. Keep moisture reasonably consistent rather than alternating between severe drought and saturation.
Avoid allowing the bulbs to become overcrowded. Congestion reduces the compost and root space available to each plant. Divide or repot crowded clusters during dormancy to encourage stronger individual bulbs.
Remember that recently forced gift lilies may not follow their natural flowering schedule immediately. They may need a full outdoor growing cycle before blooming normally again. Healthy leaves during the first season are still a positive result.
Why Did My Potted Lily Not Flower Again?
Early removal of green foliage is a common reason for poor flowering. When the leaves are cut soon after blooming, the bulb cannot replace the energy used to produce the previous display. It may grow leaves the next year without having enough reserves for flowers.
Insufficient light can also produce weak or non-flowering growth. Lilies kept in deep shade may form thin stems that lean toward brighter conditions. Move the container to a sunnier location while protecting the base from excessive heat.
A small pot, exhausted compost or lack of feeding can restrict development. Repotting crowded bulbs and supplying nutrients during active growth may improve future flowering. Avoid applying excessive fertilizer because it can damage roots or encourage unbalanced growth.
Bulb rot, pests and disease may also prevent flowering. Inspect bulbs that produce no shoots or collapse shortly after growth begins. Healthy bulbs should feel firm rather than soft, hollow or foul-smelling.
Common Mistakes After Lilies Finish Flowering
The most damaging mistake is cutting down the entire lily while its leaves are still green. Although the bare container may look tidier, the bulb loses its main opportunity to store energy for the next growing season.
Another mistake is completely neglecting the pot after the flowers fade. Active foliage still needs light, moderate moisture and nutrients. Moving it into darkness or allowing repeated severe drought can weaken the bulb.
Overwatering after dormancy begins is equally problematic. A pot with no active foliage uses little water, particularly in cold weather. Constant saturation deprives the bulb and roots of oxygen and encourages decay.
Some gardeners keep lilies crowded in the same depleted compost for many years. The plants may survive but produce progressively smaller displays. Periodic division, repotting and compost renewal maintain healthier growth.
Watch for Lily Beetles and Other Pests
Red lily beetles can damage the leaves, stems and flower buds of true lilies. Both the bright red adults and their larvae feed on the plant. Serious damage reduces the leaf area available to replenish the bulb.
Inspect both sides of the leaves regularly while the foliage remains green. Remove beetles, larvae and eggs by hand when the infestation is manageable. Check nearby lilies because the pests can move between plants.
Aphids may gather around young stems and flower buds. They weaken growth by feeding on plant sap and may spread viral diseases. A gentle water spray or an appropriate treatment may be useful depending on the severity.
Slugs and snails may damage emerging spring shoots before they grow tall enough to be noticed. Protecting early growth can prevent distorted stems and missing leaves. Use pest-control methods that are suitable for your garden, pets and local wildlife.
Check for Diseases and Bulb Rot
Grey mould, leaf spots and stem decay may develop when lilies have poor airflow or remain wet for long periods. Remove affected material and avoid splashing water repeatedly across the foliage. Space containers so air can move around the plants.
Bulb rot often develops in compost that remains waterlogged. Affected bulbs may become soft, brown and unpleasant-smelling. Improving drainage is essential because fungicide cannot rescue a bulb that has completely rotted.
Yellow leaves immediately after flowering can be part of normal dieback. However, yellowing that begins while flowers are still developing may indicate root damage, excessive watering, nutrient problems or disease.
Clean pots and tools before reusing them, especially after a plant has rotted. Dispose of seriously diseased bulbs and old contaminated compost. Replanting healthy bulbs into the same untreated conditions may repeat the problem.
A Simple After-Flowering Care Timeline
Immediately after each flower fades, remove the flower head and developing seed pod. Keep every healthy green leaf and most of the stem intact. Continue placing the pot in good light.
For the following several weeks, water whenever the upper compost begins drying and continue feeding at suitable intervals. Monitor the leaves for pests, disease and premature yellowing. Protect the container from prolonged saturation.
When the foliage turns yellow naturally, stop feeding and reduce watering. Allow the leaves and stems to finish dying before cutting them back. Clean debris from the compost surface.
During autumn or early winter, repot crowded lilies, refresh the upper compost or plant the bulbs into the garden. Protect pots from severe frost and winter waterlogging, then resume active care when shoots return in spring.
Important Safety Note for Cat Owners
True lilies are extremely dangerous to cats. The flowers, leaves, stems, pollen and water from a vase containing lilies can all present a serious poisoning risk. Even small exposures can lead to life-threatening kidney injury.
Keep potted lilies and cut flowers completely away from cats. Simply placing the pot on a table may not be enough because pollen can fall onto furniture or a cat’s coat. A cat may later swallow the pollen while grooming.
Do not wait for symptoms when you suspect exposure. Contact a veterinarian or animal poison service immediately, even when the cat appears normal. Early treatment greatly affects the chance of recovery.
Dogs do not generally develop the same severe kidney poisoning associated with true lilies in cats, although eating plants may still cause digestive problems. Correct plant identification remains important because other plants called lilies may contain different toxins.
Final Thoughts on Potted Lilies After Flowering
After lilies finish flowering, remove the dead blooms but leave the green stems and leaves. The remaining foliage is actively restoring energy to the bulbs and should stay in place until it yellows naturally.
Continue watering and feeding while the leaves remain healthy. Provide good light and keep the compost moist but well drained. Reduce care gradually as the plant enters its dormant stage.
Once the stems are completely dead, cut them back and decide whether to keep, repot or plant the bulbs outside. Protect dormant containers from waterlogging and extreme winter temperatures.
With the correct after-flowering care, potted lilies are not disposable plants. Healthy bulbs can return for several seasons, producing new stems and another colourful display when their needs are met.
Frequently Asked Questions
Should I cut lilies back after flowering?
Remove the faded flowers immediately, but do not cut down green stems or leaves. Wait until the foliage has turned yellow or brown naturally before removing it.
Can I leave lily bulbs in pots over winter?
Yes, lily bulbs can remain in pots if the containers drain well and are protected from extreme freezing and prolonged winter rain. A sheltered outdoor position is often suitable.
How often should I water lilies after flowering?
Water whenever the upper layer of compost begins to dry while the foliage remains green. Reduce watering after the leaves yellow and the bulbs become dormant.
Will potted lilies flower again next year?
Healthy bulbs can flower again when their foliage is allowed to die naturally and they receive adequate light, water, nutrients and winter protection. Crowded bulbs may need repotting.
When should I repot lilies after flowering?
Repot lilies in autumn after the stems and foliage have completely died back. Use fresh, free-draining compost and a deep container with reliable drainage holes.