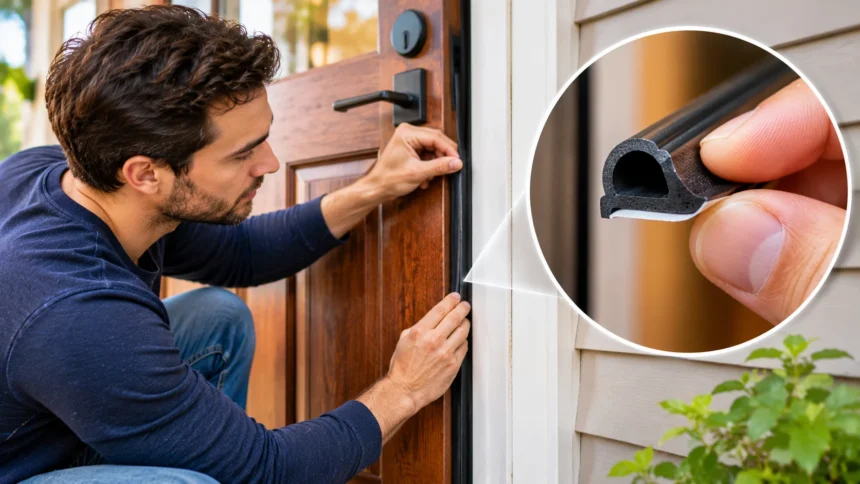
What Is Door Weather Stripping and Why Does It Matter?
Door weather stripping is a simple sealing material that closes small gaps around doors to prevent unwanted airflow. These gaps often allow cold drafts, warm outdoor air, dust, and moisture to enter your home. Installing the right weather stripping can make indoor spaces more comfortable while reducing unnecessary heating and cooling losses throughout the year.
A weather stripping door project is one of the easiest home improvements for homeowners looking to improve energy efficiency without expensive renovations. Most materials are affordable, widely available, and suitable for basic DIY installation. With careful measurements and proper placement, you can create a tighter seal around an exterior door in a relatively short time.
Weather stripping works by creating a flexible barrier between the door and its surrounding frame. This barrier compresses when the door closes, limiting air movement through small openings. Understanding how different sealing materials work helps you choose the right solution, avoid common installation mistakes, and maintain effective protection against drafts.
How to Tell if Your Door Needs Weather Stripping
One common sign of worn weather stripping is a noticeable draft around a closed door. You may feel cool air near the frame during winter or warm air entering during summer. These temperature differences can make nearby rooms uncomfortable and force heating or cooling systems to work harder than necessary.
Visible light around a closed exterior door can also indicate gaps that need attention. Inspect the sides, top, and bottom of the door from inside during daylight. If you notice light coming through, examine the existing seal for cracks, missing sections, or compression damage before deciding whether replacement weather stripping is necessary.
Other warning signs include dust collecting near the threshold, increased outdoor noise, and water entering during heavy rain. Some doors also become easier to close when old seals lose their flexibility. However, these symptoms can result from alignment or threshold problems, so checking the door’s overall condition is important before buying new materials.
Different Types of Weather Stripping for Doors
Foam tape is a popular option for sealing small, relatively even gaps around door frames. It usually has an adhesive backing that makes installation simple for beginners. Foam weather stripping is affordable and easy to cut, but it may compress or wear faster than more durable alternatives, particularly on frequently used exterior doors.
V-strip weather stripping, also called tension seal, uses a flexible material that folds into a V shape. It creates a seal when the door presses against it and works well along suitable door stops or frame surfaces. Vinyl, metal, and other flexible materials are available, with durability depending on the design and installation conditions.
Rubber and silicone weather stripping offer flexible sealing for many exterior doors. Some versions fit into existing grooves, while others attach to the frame using adhesive or fasteners. Door sweeps and threshold seals handle gaps beneath the door, making them important companions to weather stripping installed around the sides and top.
How to Choose the Right Weather Stripping for Your Door
Choosing the correct door weather stripping begins with identifying the size and location of each gap. Small openings may work well with thin foam tape, while larger or uneven spaces often require more flexible compression seals. A seal should fill the gap when the door closes without making the door difficult to latch.
The door’s material, frame design, and frequency of use also influence your choice. Wooden doors may expand and contract with changing humidity, while metal and fiberglass doors can have different sealing arrangements. High-traffic entrances generally benefit from durable rubber, silicone, or compatible replacement seals designed for repeated compression.
Consider weather exposure before selecting a product for an exterior entrance. Materials exposed to sunlight, rain, and changing temperatures should be suitable for outdoor use. If your door already has a kerf or groove for weather stripping, choosing a matching replacement profile may provide a cleaner fit than adding another adhesive seal.
Tools and Materials Needed for Door Weather Stripping
Most weather stripping installations require only a few basic tools and supplies. A measuring tape, pencil, scissors, utility knife, and cleaning cloth are useful for preparing and fitting sealing materials. Depending on the product, you may also need a screwdriver, drill, adhesive, or small fasteners to secure the weather stripping.
Before purchasing supplies, measure the top and both vertical sides of the door frame. Measure the bottom separately if you plan to install a door sweep or threshold seal. Buying slightly more material than your measurements require allows for trimming errors and helps prevent interruptions during the project.
Choose products that include clear installation instructions and are compatible with your door type. Adhesive seals need clean, dry mounting surfaces, while screw-mounted products require suitable fixing points. Wear eye protection when drilling, handle cutting tools carefully, and avoid modifying fire-rated doors or security hardware without checking the manufacturer’s requirements.
How to Prepare a Door Before Installing Weather Stripping
Proper preparation is essential for creating a reliable and long-lasting door seal. Begin by opening and closing the door to check whether it moves smoothly and latches correctly. If the door rubs against the frame or hangs unevenly, address these problems before installing additional sealing material that could increase resistance.
Remove damaged or loose weather stripping from the door frame using suitable tools. Peel adhesive materials away carefully to avoid damaging paint or the underlying surface. If old adhesive remains, clean it with a product appropriate for the frame material, following the cleaner’s instructions and testing delicate finishes first.
Next, wipe the installation area to remove dust, grease, and moisture. Allow the surface to dry completely before applying adhesive-backed weather stripping. Inspect the door stop, threshold, and frame for cracks or damage, because weather stripping cannot reliably correct structural problems or large openings caused by a poorly fitted door.
How to Install Adhesive Weather Stripping Around a Door
Adhesive weather stripping is one of the easiest options for beginners because it usually requires no drilling. Start by measuring the length of the door stop where the seal will make contact. Cut the material to fit, leaving enough length for neat corners while avoiding overlaps that might prevent the door from closing.
Position the weather stripping so it compresses gently against the closed door. Begin at the top or one vertical side, depending on the product instructions, and peel away the adhesive backing gradually. Press the material firmly onto the prepared surface, keeping it straight and avoiding unnecessary stretching during installation.
After attaching the seal, close the door slowly to test the fit. The door should latch securely without requiring excessive pressure, and the material should contact the door along its intended length. If the seal bunches, shifts, or creates resistance, adjust its position before continuing with the remaining sections.
How to Install V-Strip and Compression Door Seals
V-strip weather stripping is useful when you need a flexible seal along suitable door frame surfaces. Measure the installation area carefully and cut the strip according to the manufacturer’s directions. Because the material uses spring-like tension, correct positioning is important for maintaining contact without interfering with normal door operation.
For adhesive V-strip, clean the surface before attaching the folded material along the appropriate frame edge. Follow the product’s orientation instructions so the flexible portion presses against the door when closed. Some metal tension strips require small nails or other fasteners, making careful alignment necessary to avoid damaging the frame.
Compression seals made from rubber or silicone may attach using adhesive, clips, or an existing frame groove. For kerf-style weather stripping, remove the old insert and press the compatible replacement into the channel. Check the entire perimeter afterward, ensuring the seal sits evenly and does not prevent the latch from engaging properly.
How to Seal the Bottom of a Door With a Door Sweep
The gap beneath an exterior door is often a major source of unwanted drafts. A door sweep attaches near the bottom of the door and helps block air, dust, and some wind-driven moisture. Common designs include flexible vinyl fins, rubber blades, and brush-style seals intended for different door and flooring conditions.
To install a screw-mounted door sweep, measure the door width and trim the sweep if the manufacturer permits cutting. Hold it against the closed door so its sealing edge makes suitable contact with the threshold. Mark the mounting positions carefully, then attach the sweep according to the product instructions without damaging internal door components.
Open and close the door several times after installation to check for scraping or excessive resistance. The sweep should maintain contact with the threshold without catching or dragging heavily across the floor. If a large gap remains, the threshold may need adjustment or replacement rather than using an oversized sweep to compensate.
How to Improve Door Threshold and Corner Seals
Door thresholds help form the bottom sealing surface and protect the transition between indoor and outdoor flooring. Some exterior doors have adjustable thresholds that can be raised or lowered to improve contact with the door’s bottom seal. Small adjustments may reduce drafts, but excessive height can interfere with closing and damage the sealing material.
The lower corners of exterior doors are another common location for air leaks. Small gaps may appear where the vertical weather stripping meets the threshold or door sweep. Compatible corner pads or manufacturer-approved sealing accessories can sometimes improve this area, provided they do not obstruct drainage paths or interfere with the door.
Weather stripping should reduce unwanted airflow without trapping water inside the frame or preventing necessary ventilation. Avoid sealing designed drainage openings, particularly on exterior door systems that manage rainwater through specific channels. If water continues entering around the threshold, investigate drainage, flashing, and installation problems rather than relying on thicker seals alone.
How Much Does Door Weather Stripping Cost?
The cost of weather stripping a door depends on the material, door size, and installation method. Basic adhesive foam tape is generally among the least expensive choices, while durable compression seals and complete weather stripping kits usually cost more. Door sweeps, threshold replacements, and specialized fittings can increase the overall project expense.
For many standard doors, DIY installation costs substantially less than replacing the entire door or hiring someone for a minor sealing job. However, prices vary by region, product quality, and the amount of repair work required. Measuring accurately and selecting the correct materials from the beginning helps prevent unnecessary purchases and wasted supplies.
The potential savings come from reducing uncontrolled air leakage around the entrance. Improved sealing can reduce heating and cooling demand, although actual savings depend on climate, existing insulation, and the size of the gaps. A well-sealed door may also improve comfort and limit some outdoor noise, adding value beyond energy costs.
Common Door Weather Stripping Mistakes to Avoid
One common mistake is choosing weather stripping that is too thick for the available gap. Excessive compression can make a door difficult to close, place strain on hardware, or prevent the latch from engaging securely. Measuring the opening and testing the seal before completing installation helps avoid these problems.
Another frequent issue involves applying adhesive weather stripping to dirty, damp, or damaged surfaces. Poor surface preparation can cause the seal to loosen, peel away, or shift during regular use. Stretching foam tape during installation can also affect its fit, so apply it evenly while following the manufacturer’s recommendations.
Homeowners sometimes overlook the bottom corners, threshold condition, or overall door alignment when addressing drafts. Replacing worn seals alone may not fix leaks caused by a warped door or damaged frame. Taking time to inspect the entire entrance helps identify the actual source of the problem and prevents repeated unsuccessful repairs.
How to Maintain Weather Stripping for Long-Lasting Results
Regular maintenance helps weather stripping remain flexible and effective throughout changing seasons. Inspect exterior doors periodically for loose sections, cracks, flattened areas, and signs of moisture damage. Pay particular attention to high-contact surfaces and door bottoms, where repeated movement can gradually wear down sealing materials.
Cleaning the weather stripping with a soft cloth and a mild cleaner recommended for the material can remove accumulated dirt. Avoid harsh chemicals that might damage rubber, silicone, or adhesive surfaces. After cleaning, confirm that the seal still contacts the door properly and that the entrance opens, closes, and locks smoothly.
Replace sections that have become brittle, torn, permanently compressed, or detached from the frame. The replacement interval depends on material quality, exposure, and door usage rather than a fixed schedule. Addressing small problems early can help maintain an effective seal and reduce the chance of more extensive repairs later.
Conclusion
Installing door weather stripping is a practical and affordable way to reduce drafts and improve indoor comfort. The correct sealing material can close gaps around the door frame, limit unwanted air movement, and support better energy efficiency. With suitable tools and careful preparation, many homeowners can complete this improvement without professional assistance.
Choosing the right product is just as important as installing it correctly. Foam tape, V-strips, compression seals, door sweeps, and threshold adjustments serve different purposes. Measuring gaps, checking door alignment, and following installation instructions help create a dependable seal without interfering with normal operation.
Regular inspections and simple maintenance can keep weather stripping working effectively for longer. Replace worn materials when necessary and investigate persistent leaks that may indicate larger door or frame problems. A properly weather-stripped door offers a straightforward way to improve comfort while avoiding the expense of unnecessary replacement.
Frequently Asked Questions
What is the best weather stripping for an exterior door?
Durable rubber or silicone compression seals are often good choices for exterior doors. The best option depends on the gap size, frame design, weather exposure, and compatibility with existing sealing channels.
How do I stop cold air from coming through my door?
Inspect the door frame and threshold for gaps or damaged seals. Replace worn weather stripping, install a suitable door sweep, and correct alignment problems that prevent the door from closing tightly.
Can I install door weather stripping myself?
Yes, many door weather stripping products are suitable for DIY installation. Adhesive foam and some compression seals require only basic measuring, cleaning, cutting, and careful positioning to create an effective seal.
How long does weather stripping last on a door?
Weather stripping lifespan depends on material quality, weather exposure, and frequency of use. Some inexpensive foam products wear relatively quickly, while quality rubber or silicone seals may last several years with proper maintenance.
Does weather stripping a door really save energy?
Yes, properly installed weather stripping can reduce air leakage and improve heating and cooling efficiency. Actual energy savings depend on the home’s existing condition, local climate, and the severity of the original gaps.