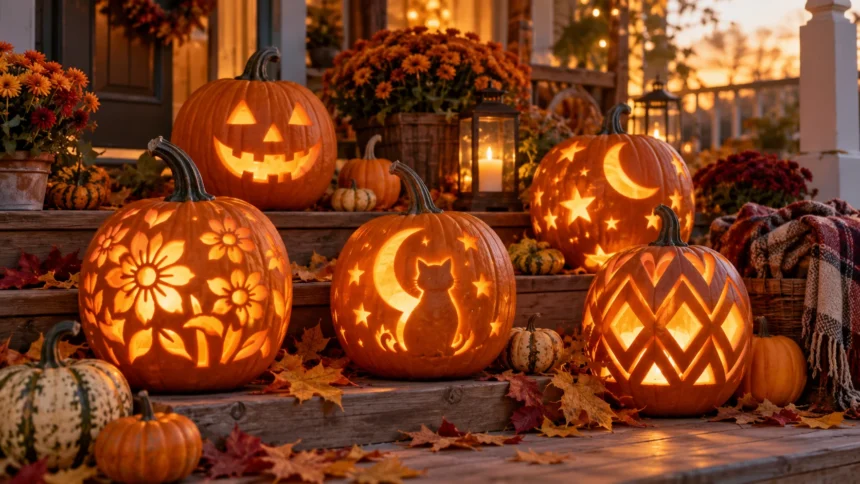
Carved pumpkins are one of the easiest ways to bring personality to fall decorating, whether you love classic Halloween faces, elegant patterns, or playful designs for kids. A simple pumpkin can become spooky, charming, modern, or artistic depending on the shapes you cut and the way you display it. You also do not need advanced carving skills to create something memorable.
The best carved pumpkin ideas match your available time, tools, and decorating style. Beginners may prefer bold shapes and simple faces, while experienced carvers can experiment with layered designs, detailed patterns, and partially shaved surfaces. Choosing a good pumpkin and planning the design before cutting can make the entire process easier.
From traditional jack-o’-lanterns and ghost faces to floral patterns, stars, animals, and minimalist designs, there are countless directions to explore. You can also group several carved pumpkins together to create a larger porch or indoor display. These creative looks offer inspiration for everything from family carving nights to polished seasonal decorations.
Classic Jack-o’-Lantern Faces
Classic jack-o’-lanterns remain popular because they are easy to recognize and simple enough for most beginners. Triangle eyes, a small nose, and a wide toothy grin can transform an ordinary pumpkin within minutes. You can make the expression cheerful, mischievous, angry, or spooky by changing the angles and proportions of the features.
Try sketching the face lightly before cutting so you can adjust the expression without damaging the pumpkin. Larger eyes and mouths are easier to carve than tiny details, particularly when using basic pumpkin tools. Keeping enough pumpkin between each opening also helps the design remain structurally strong after carving.
You can give the traditional look more personality by varying the teeth or making the eyes different sizes. A crooked grin creates a playful effect, while narrow eyes make the face appear more dramatic. Grouping several pumpkins with different expressions can create a lively front-step display without requiring complicated patterns.
Easy Carved Pumpkin Ideas for Beginners
Simple geometric shapes are perfect if you are carving a pumpkin for the first time. Circles, triangles, crescent moons, stars, and basic lines are easier to control than complicated illustrations. Repeating the same small shape around the pumpkin can also create a polished design without requiring advanced carving techniques.
Cookie cutters can help create consistent outlines if you want an easy way to plan shapes. Press the cutter gently against the pumpkin skin to mark the design before cutting. You can also use a washable marker to sketch larger shapes, giving yourself a clear path to follow with your carving tool.
Avoid choosing a design with dozens of tiny sections when you are still learning. A few bold openings usually produce stronger light patterns and are less likely to break. Once you become comfortable controlling the knife or carving saw, you can gradually try more detailed designs in future pumpkins.
Spooky Ghost Pumpkin Designs
Ghost designs are ideal for Halloween because they can look creepy without being difficult to carve. A simple ghost silhouette needs only a rounded head, flowing lower edge, and basic facial features. When illuminated from inside, the large cutout produces a bright shape that stands out clearly in the dark.
You can create several smaller ghosts around one pumpkin instead of carving a single large figure. Vary their expressions by using round eyes, surprised mouths, or angled brows. This approach creates a more playful scene and works especially well on larger pumpkins with plenty of surface area.
For a more dramatic look, carve a ghost emerging from a doorway, window, or graveyard shape. Keep the supporting sections wide enough that delicate areas do not collapse. Combining carved openings with lightly scraped details can also add depth without cutting every part completely through the pumpkin.
Cute Pumpkin Faces for Kids
Not every carved pumpkin has to be frightening. Cute faces with round eyes, small noses, and smiling mouths can create a friendly look that works well for families with younger children. Simple animal-inspired expressions are another fun option if traditional jack-o’-lantern faces feel too spooky.
Cats, owls, rabbits, and bears can all be suggested using basic ears, eyes, and mouth shapes. You can use the pumpkin’s natural stem as part of the character or add removable decorative pieces around the carved design. Adults should handle cutting tools while children can help choose patterns and draw outlines.
Try carving several small pumpkins with different cheerful faces and arranging them together. One can smile, another can look surprised, and another can have sleepy eyes. A collection of expressive pumpkins creates a playful seasonal display and allows each family member to contribute an individual design.
Floral Carved Pumpkin Ideas
Floral pumpkin carving offers a softer alternative to traditional Halloween imagery. Flowers, leaves, vines, and botanical patterns can make pumpkins feel elegant enough for autumn decorating throughout the season. These designs work particularly well when displayed on dining tables, porches, mantels, or entryway consoles.
Start with a large central flower if you want a simple botanical design. Petals can be carved completely through the pumpkin, while leaf veins or smaller details can be scraped only partially into the surface. Mixing carving depths creates contrast once the pumpkin is illuminated from within.
Repeating small flowers around the pumpkin can create a more decorative pattern. You can also combine leaves with dots, stars, or curved lines for additional texture. White or pale pumpkins look especially refined with botanical patterns because the lighter exterior gives the finished design a softer appearance.
Star and Moon Pumpkin Carvings
Celestial designs are easy to customize and look striking when lit at night. Crescent moons, stars, clouds, and small circular holes can transform a pumpkin into a glowing night-sky decoration. These motifs can feel festive for Halloween while still being subtle enough to use throughout the fall season.
For an easy design, carve one large crescent moon and surround it with stars of different sizes. Small holes made with a suitable carving tool can resemble distant points of light. Spacing the shapes unevenly often creates a more natural appearance than arranging everything in perfectly straight rows.
You can also create a constellation-inspired pumpkin by connecting small openings with lightly scraped lines. Choose a pattern that fits the available surface and avoid placing delicate cuts too close together. Once illuminated, the combination of bright holes and softly glowing scraped areas can create impressive visual depth.
Minimalist Carved Pumpkin Designs
Minimalist pumpkin designs focus on clean shapes and fewer details. Instead of covering the entire surface, you might carve a single leaf, simple face, small arch, or repeated line pattern. This approach can feel modern and sophisticated while requiring less carving time than highly detailed Halloween scenes.
Negative space is especially important in minimalist designs. Leaving most of the pumpkin intact allows the carved area to become the clear focal point. A few carefully placed openings often look more intentional than filling every available section simply because there is room.
Minimalist pumpkins also combine easily with neutral fall décor. Place them beside dried leaves, candles, woven baskets, or plain ceramic pieces for a relaxed seasonal look. Using pumpkins in cream, pale green, or muted orange can make these understated carvings feel even more contemporary.
Animal-Inspired Pumpkin Carving Ideas
Animal designs offer plenty of creative possibilities because you can choose anything from cats and bats to owls, foxes, or woodland creatures. Silhouettes are usually easier than realistic portraits and still look recognizable when illuminated. A black-cat outline against a glowing pumpkin background is a classic example.
For an owl design, use large circular eyes and simple feather shapes. A fox can be suggested with pointed ears and an angular face, while bats require only curved wings and a small body. Selecting one or two defining characteristics keeps the design easy to identify without adding excessive detail.
You can also carve paw prints around a pumpkin for an easier animal theme. Repeating prints in different directions creates movement and works well for pet lovers. If you want a more personalized decoration, incorporate the general shape of a favorite pet while simplifying the features enough for safe carving.
Patterned Pumpkins With Repeating Cutouts
Repeating patterns can make carved pumpkins look polished and decorative without requiring drawing skills. Dots, diamonds, scallops, leaves, and small stars can be arranged across the pumpkin in rows or loose clusters. Even simple shapes become visually interesting when repeated consistently.
Start by marking the spacing before cutting. Measuring roughly around the pumpkin helps prevent the pattern from becoming crowded in one area and empty in another. Perfect symmetry is not essential, but planning the layout makes the finished design appear more deliberate.
Patterned pumpkins are especially attractive when several are grouped together. One pumpkin might feature dots, another stars, and another geometric lines while all use the same general style. This creates variety without making the overall display feel disconnected or overly busy.
Creative Pumpkin Displays Around the Home
Carved pumpkins are commonly placed on porches, but they can also decorate entryways, mantels, covered patios, and dining areas. Use several heights by placing pumpkins on low stools, wooden crates, or sturdy stands. Grouping large and small pumpkins together creates more visual depth than arranging everything in a straight line.
Indoor displays should stay clear of walking paths, cords, and frequently used equipment. If your home office includes exercise equipment such as an under desk treadmill, keep seasonal decorations away from the moving area and power cables. A safe display can still feel festive without interfering with everyday routines.
Battery-powered lights are often more practical indoors than open flames. They reduce heat and make it easier to place carved pumpkins near other seasonal decorations. You can also rotate pumpkins between different areas of the home depending on how long you want the display to remain visible.
Tips for Carving a Pumpkin Cleanly
Start with a firm pumpkin that has no major soft spots or damaged areas. Wash and dry the exterior so the surface is easier to handle while carving. If you plan to illuminate it, cut an opening that gives you enough room to remove the seeds and scrape away loose interior fibers.
Thin the inner wall behind detailed designs so the carving tool does not have to pass through an unnecessarily thick layer. However, avoid making the wall so thin that it becomes weak. Working slowly and making short controlled cuts usually produces cleaner edges than forcing the blade through quickly.
Draw or transfer your pattern before you begin cutting. Complete larger structural cuts first and save delicate sections for later so you do not accidentally break them while handling the pumpkin. Turning the pumpkin as you work can also provide a safer cutting angle than twisting your wrist awkwardly.
How to Make Carved Pumpkins Last Longer
Pumpkins naturally begin deteriorating after they are cut because the exposed interior loses moisture and becomes vulnerable to decay. Start with a healthy pumpkin and avoid carving it too far in advance if you want it to look fresh for a specific event. Cooler conditions generally help carved pumpkins last longer than warm, humid environments.
Keep carved pumpkins away from strong direct sunlight and excessive heat whenever possible. If the design becomes visibly dry, moving it to a cooler protected location may help slow further deterioration. Avoid leaving standing water inside because excessive moisture can also encourage the pumpkin to break down more quickly.
Inspect your display regularly and discard any pumpkin that becomes heavily moldy, collapses, or develops an unpleasant odor. Decorative longevity will vary with weather, temperature, and pumpkin condition. Creating several designs on different days can help maintain a fresh-looking display throughout the Halloween season.
Conclusion
Carved pumpkin ideas can range from traditional jack-o’-lanterns to floral patterns, celestial motifs, animal silhouettes, and modern geometric designs. The best design is one that matches your carving ability and decorating style. Simple patterns can look just as impressive as complicated artwork when they are planned carefully and illuminated well.
Beginners should focus on bold shapes, clean outlines, and manageable patterns before moving into delicate details. Drawing the design first, thinning thick areas, and carving slowly can make the process much easier. Creative displays using multiple pumpkins can also produce a dramatic effect without requiring every pumpkin to have an elaborate design.
Most importantly, have fun experimenting with different expressions, patterns, and themes. Pumpkin carving is temporary seasonal art, so it is a perfect opportunity to try something playful or unexpected. Whether you prefer spooky faces or elegant botanical designs, a thoughtfully carved pumpkin can instantly bring autumn personality to your home.
FAQs
What are the easiest pumpkin carving ideas for beginners?
Simple faces, stars, moons, dots, and geometric patterns are easy places to start. Choose larger shapes with fewer narrow sections so the pumpkin remains strong and the design is easier to cut.
How do you make a carved pumpkin look more creative?
Combine different carving depths, repeat small patterns, or use unexpected themes such as flowers and animals. Grouping several complementary pumpkins together can also make a simple design feel much more impressive.
What tools are best for pumpkin carving?
A pumpkin carving kit with small saws and scooping tools can provide better control than a large kitchen knife. Adults should supervise children and handle sharp tools during family carving activities.
How long do carved pumpkins last?
The lifespan varies depending on temperature, humidity, pumpkin condition, and storage. Carved pumpkins generally deteriorate faster than whole pumpkins, so carve them relatively close to when you want to display them.
Can you use lights inside carved pumpkins?
Yes. Battery-powered LED lights are a convenient option because they produce a glow without an open flame. They are especially useful for indoor displays or areas containing other nearby decorations.