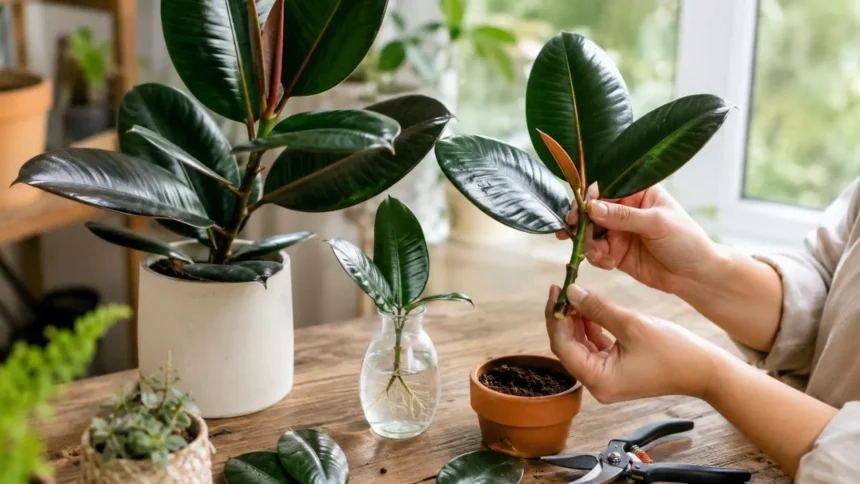
How to Propagate a Rubber Tree Plant Successfully
Learning how to propagate a rubber tree plant is a rewarding way to create new houseplants from an established Ficus elastica. With the right cutting, warm conditions and a little patience, one healthy parent plant can produce several attractive rubber plants for your home.
Rubber plant propagation is commonly done through stem cuttings, but gardeners can choose between rooting cuttings in soil or water. Air layering is another reliable method, especially when working with a tall, mature plant or a stem that is too thick for a small cutting.
The key to successful propagation is including at least one healthy node on the stem. A node is the point where a leaf joins the main stem, and it contains the plant tissue needed to produce new roots and future growth.
Although rubber plants are relatively easy to propagate, they do not normally root overnight. Consistent warmth, bright indirect light, clean tools and controlled moisture will give your cutting the best chance of developing into a strong new plant.
Can You Propagate a Rubber Tree Plant?
Yes, rubber tree plants can be propagated successfully at home using several practical methods. Stem cuttings are the most popular choice because they require little equipment and allow growers to use sections removed during routine pruning.
A rubber plant cutting can be rooted directly in a light potting mix or placed in water until visible roots develop. Both methods can work well when the cutting contains a healthy node and receives suitable warmth, humidity and indirect sunlight.
Air layering is another effective propagation method for rubber plants. Instead of completely removing the stem at the beginning, roots are encouraged to form while the selected section remains attached to the parent plant.
A single leaf without a node may survive for a long time and sometimes produce roots, but it usually cannot develop into a complete new plant. For reliable propagation, always take a stem section containing at least one node.
What Is the Best Time to Propagate a Rubber Plant?
Spring and early summer are usually the best times to propagate a rubber tree plant. During this period, increasing temperatures and daylight encourage active growth, allowing cuttings to develop roots more quickly than they might during winter.
A healthy rubber plant naturally produces new leaves and stems during the warmer growing season. Cuttings taken at this time often recover from pruning more efficiently and have enough energy to support both root formation and new foliage.
Propagation can still work during autumn or winter, but the rooting process may take considerably longer. Cooler rooms, reduced daylight and dry indoor heating can slow growth and increase the risk of overwatering the cutting.
If you must propagate outside the main growing season, place the cutting in a warm location with bright indirect light. A grow light and heat mat may help create more favourable conditions, particularly in homes with cold windows or limited natural sunlight.
Tools and Materials You Will Need
Before taking a rubber plant cutting, gather a clean, sharp pair of pruning shears or a sterile knife. A smooth cut causes less damage to the parent plant and reduces the risk of introducing bacteria or fungi into fresh tissue.
You will also need a small container, a suitable rooting medium and clean water. A light mixture containing houseplant potting soil, perlite and coco coir can provide moisture while still allowing enough oxygen to reach developing roots.
Rooting hormone is optional, but it may encourage faster or more consistent root production. A clear plastic bag, propagation box or humidity dome can also help prevent the leaves from losing too much moisture before roots become established.
Wear gloves and protect nearby surfaces while working. Rubber plants release a sticky white latex sap when cut, and this sap may irritate sensitive skin, damage clothing or leave difficult marks on floors and furniture.
Understanding Nodes on a Rubber Plant Cutting
Identifying a node is one of the most important steps in rubber plant propagation. The node appears as a slightly raised section of the stem where a leaf, branch or leaf scar is attached.
New roots commonly form around or below this part of the cutting. Without a node, the plant material lacks the growing point required to produce a complete rubber tree with new stems and leaves.
A useful cutting normally contains one to three nodes and at least one healthy leaf. Longer cuttings can work, but they may lose more moisture and require additional energy to remain alive while new roots are forming.
Make the lower cut just beneath a node because this places active plant tissue close to the rooting medium. Remove any leaf that would sit below the water line or become buried in the potting mix.
How to Take a Rubber Plant Stem Cutting
Choose a healthy, disease-free stem with firm growth and undamaged leaves. Avoid using weak, yellowing or pest-infested sections because stressed material may struggle to produce roots and could spread problems to the new plant.
Cut a section approximately four to eight inches long, making the cut just below a node. The ideal length depends on the size of the parent plant, but the cutting should contain enough stem to handle easily without becoming unnecessarily large.
Remove the lowest leaf and leave one or two leaves near the top. If the remaining leaves are very large, gently roll and secure them or cut part of each leaf to reduce moisture loss during rooting.
Rinse or blot away the white sap and allow the cut surface to stop dripping. You can then dip the bottom of the stem in rooting hormone or place it directly into water or prepared potting mix.
How to Propagate a Rubber Tree Plant in Soil
Fill a small pot with a loose, well-draining propagation mix and moisten it lightly. The soil should feel evenly damp but should not release water when squeezed, as saturated conditions can cause the cutting to rot.
Create a planting hole with a pencil or finger to avoid rubbing off the rooting hormone. Insert the stem deeply enough to place at least one node below the soil surface, then gently firm the mix around it.
Place a clear plastic bag or humidity cover over the cutting without allowing the plastic to press heavily against the leaf. Open the cover regularly to provide fresh air and reduce excessive condensation.
Keep the pot in bright indirect light and maintain consistent warmth. Check the soil every few days, watering only when the upper layer begins to dry rather than following a fixed daily watering schedule.
How to Propagate a Rubber Plant in Water
Water propagation allows you to watch the roots form, making it an appealing method for beginners. Place the prepared cutting in a clean jar so the lower node is underwater while the leaves remain above the surface.
Use room-temperature water and position the container in bright indirect light. Strong direct sunlight can heat the water, encourage algae growth and place unnecessary stress on a cutting that has not yet developed roots.
Change the water every few days or whenever it becomes cloudy. Clean water supplies oxygen to the stem and reduces the buildup of microorganisms that might cause the submerged section to become soft or discoloured.
Once several roots are approximately two to three inches long, transfer the cutting into a small pot containing moist, well-draining soil. Do not wait until the water roots become excessively long, tangled or difficult to handle.
How to Propagate a Rubber Plant by Air Layering
Air layering is especially useful for tall rubber plants that have become leggy or top-heavy. The method encourages roots to develop on a selected stem before the new plant is separated from the parent.
Choose a healthy section of stem below a leaf node. Make a shallow upward cut or carefully remove a narrow ring of outer tissue, taking care not to cut completely through the stem.
Apply rooting hormone to the wounded area, then cover it with damp sphagnum moss. Wrap the moss securely with clear plastic and seal both ends to maintain moisture while still allowing the root development to be checked.
When a visible network of roots fills the moss, cut the rooted section below the wrapped area. Remove the plastic carefully and plant the new rubber tree in a container filled with well-draining potting mix.
Soil Propagation vs Water Propagation
Soil propagation allows the cutting to produce roots that are already adapted to growing in potting mix. This can reduce transplant stress because the young plant does not need to adjust from water roots to soil conditions later.
However, soil makes it difficult to observe root development. Growers must judge progress by looking for new leaves, gentle resistance when the stem is lightly tugged or roots appearing through the pot’s drainage holes.
Water propagation is visually satisfying and makes it easier to monitor the cutting for roots or rot. It also allows beginners to understand how quickly a particular stem is responding before moving it into a permanent container.
The main disadvantage is that water-grown roots may be more delicate than soil-grown roots. Both methods are effective, so the best option depends on your experience, available supplies and preferred way of monitoring progress.
Should You Use Rooting Hormone?
Rooting hormone is not essential for rubber plant propagation, but it can improve the likelihood of successful rooting. It is particularly helpful when propagating thicker stems, slower-growing cuttings or plants outside the strongest growing season.
Powder, gel and liquid rooting products are commonly available. Follow the directions carefully because applying more hormone than recommended will not necessarily produce faster or healthier roots.
Pour a small amount of rooting hormone into a separate container rather than dipping the cutting directly into the original package. This simple step prevents plant sap and possible pathogens from contaminating the remaining product.
A healthy node, clean cutting and proper environment are still more important than rooting hormone alone. The product cannot compensate for cold temperatures, poor drainage, excessive water or a stem that does not contain viable growing tissue.
The Best Conditions for Root Development
Rubber plant cuttings root most successfully in warm conditions between approximately 70°F and 80°F. Temperatures that remain consistently cold can slow biological activity and leave the cutting vulnerable to decay before roots form.
Provide bright indirect sunlight without exposing the cutting to harsh midday rays. A location near an east-facing window or several feet away from a bright south-facing window often provides a suitable balance.
High humidity helps reduce water loss through the leaves while the cutting has no established root system. A covered propagation container can help, but it should be opened regularly to prevent stagnant air and mould.
The rooting medium should remain lightly moist rather than constantly wet. New roots require both water and oxygen, so dense, saturated soil can suffocate delicate tissue and encourage stem rot.
How Long Does Rubber Plant Propagation Take?
Rubber plant cuttings may begin forming roots within three to six weeks under favourable conditions. However, some cuttings require eight weeks or longer, especially when temperatures are cool or the parent plant was not actively growing.
Water-propagated cuttings make early root growth easy to observe. Small white bumps may appear first, followed by thin roots that gradually lengthen and branch as the cutting continues developing.
Soil-propagated cuttings may show no visible change for several weeks. New leaf growth, a firm stem and gentle resistance when the plant is lightly pulled usually indicate that roots are forming below the surface.
Avoid repeatedly removing the cutting from the soil to inspect it. Disturbing fragile roots can damage them and restart part of the rooting process, so patience is essential during this stage.
When to Transplant a Rooted Rubber Plant Cutting
A water-rooted cutting is generally ready for soil when it has several healthy roots around two to three inches long. Multiple roots provide better support than a single long root and improve the plant’s ability to absorb moisture after transplanting.
Choose a pot only slightly larger than the root system. An oversized container holds moisture for longer periods, increasing the possibility of root rot while the young plant is still adjusting.
Fill the container with a well-draining indoor plant mix and create a hole for the roots. Position the cutting carefully, cover the roots without bending them sharply and press the soil gently around the stem.
Water thoroughly after planting and allow excess moisture to drain. Keep the newly potted rubber plant in the same bright, warm conditions while it transitions from water propagation to normal soil-based growth.
Caring for a Newly Propagated Rubber Plant
Keep the young rubber plant in bright indirect light for the first several weeks. Sudden exposure to strong sunlight can scorch tender leaves before the roots are developed enough to replace lost moisture.
Water when the upper one or two inches of soil feel dry. Newly rooted plants should not become completely dehydrated, but consistently wet potting mix can damage their small and sensitive root systems.
Avoid fertilizing immediately after propagation. Wait until the plant shows clear new growth, then begin with a diluted balanced houseplant fertilizer during spring or summer.
Newly propagated plants may occasionally lose an older leaf after being moved. This does not always mean the cutting has failed, especially when the stem remains firm and fresh growth begins appearing from a node.
Why Is My Rubber Plant Cutting Not Rooting?
A cutting may fail to root if it does not contain a node. A leaf and its stalk can remain green in water, but without a section of stem containing active growth tissue, it cannot become a full plant.
Low temperatures are another common reason for slow rooting. Moving the cutting away from a cold window or placing it on a controlled heat mat can support root development without exposing it to damaging direct heat.
Insufficient light may also prevent progress. Although direct sun should be avoided, the cutting still needs several hours of bright indirect light each day to produce the energy required for root growth.
Some healthy cuttings simply need more time. If the stem remains firm, the leaves are reasonably healthy and no dark rot is visible, continue providing stable conditions rather than changing the setup repeatedly.
Why Is the Cutting Turning Yellow?
One yellowing leaf can be a normal response to propagation stress. The cutting may redirect stored energy away from an older leaf while attempting to produce roots and maintain the remaining foliage.
Several yellow leaves may indicate overwatering or poor drainage. Check whether the soil is saturated, the container lacks drainage holes or the base of the stem has become soft and dark.
A water-propagated cutting may yellow when its water is dirty, cold or rarely replaced. Refresh the container, rinse it carefully and make sure no leaves are sitting below the water surface.
Yellowing can also result from very low light. Move the cutting to a brighter location with filtered sunlight, but make the change gradually to avoid additional stress or leaf scorching.
How to Prevent Stem and Root Rot
Start with a clean cutting taken from a healthy parent plant. Sterilize your pruning tool before use and avoid propagating stems that already have dark marks, damaged tissue or signs of pests.
For soil propagation, use a container with functioning drainage holes and a light potting mix. Never allow the pot to sit in a saucer of water after irrigation.
For water propagation, replace cloudy water promptly and clean the jar. If the submerged stem becomes black, mushy or foul-smelling, remove the damaged section with a sterile blade before trying again.
Good airflow is important even when using a humidity cover. Open the bag or dome each day, remove heavy condensation and avoid allowing wet plastic to rest continuously against the leaves.
Can You Propagate a Rubber Plant From a Leaf?
A rubber plant leaf may produce roots when placed in water or soil, but roots alone do not guarantee a new plant. The cutting needs a node containing the growth point required to create a stem.
This is why leaf-only cuttings can remain alive for months without producing additional foliage. They may look decorative in water, but they usually stay as a rooted leaf rather than developing into a mature rubber tree.
For successful propagation, take a leaf with a small section of the main stem attached. This type of node cutting has the biological structure needed to produce both roots and new above-ground growth.
When selecting propagation material, examine the stem carefully rather than focusing only on the leaf. A small, healthy cutting with a node is more valuable than a large leaf with no growing point.
How to Prune the Parent Rubber Plant
Taking cuttings can also improve the shape of an established rubber plant. Pruning the main stem encourages dormant buds below the cut to produce branches, creating a fuller and less leggy appearance.
Make the cut slightly above a healthy node on the parent plant. The removed upper portion can then be shortened and prepared as one or more propagation cuttings, depending on its length.
Do not remove too much growth from a weak or recently stressed rubber plant. A healthy parent can recover from moderate pruning, but severe cutting may slow growth and make it more vulnerable to environmental changes.
Clean away dripping latex sap and keep the plant in its normal growing conditions. Avoid repotting, relocating and heavily fertilizing it immediately after pruning, as several major changes at once can increase stress.
Common Rubber Plant Propagation Mistakes
Using a leaf without a node is one of the most common mistakes. The leaf may root, leading the grower to expect a new plant, but it usually lacks the tissue needed to form future stems.
Another mistake is keeping the propagation mix constantly saturated. Cuttings need moisture, but excess water pushes oxygen out of the soil and creates conditions where bacteria and fungi can damage the stem.
Placing a fresh cutting in strong direct sunlight can cause rapid moisture loss and leaf burn. Bright filtered light is safer until the cutting has developed a root system capable of supporting its foliage.
Frequent handling can also delay progress. Moving the cutting, checking the roots and changing its location every few days prevent stable growth, so choose an appropriate setup and allow the plant time to respond.
Final Thoughts on Propagating a Rubber Tree Plant
The easiest way to propagate a rubber tree plant is to take a healthy stem cutting containing at least one node. That cutting can then be rooted in either water or a light, well-draining potting mix.
Water propagation allows you to watch the roots develop, while soil propagation may produce roots that adapt more quickly to normal container conditions. Air layering is an excellent alternative for large, mature or leggy plants.
Warm temperatures, bright indirect light and moderate humidity are more important than expensive propagation equipment. Keeping the stem healthy and avoiding excessive moisture will greatly improve the likelihood of success.
With clean tools and patient aftercare, a single rubber plant can produce several new houseplants. The process also provides a useful opportunity to prune an overgrown parent plant and encourage a fuller, more balanced shape.
Frequently Asked Questions
Can you root a rubber plant cutting in water?
Yes, place a stem cutting with at least one node in clean water and keep the leaves above the surface. Change the water regularly until several roots are two to three inches long.
How long does a rubber tree cutting take to root?
Most rubber plant cuttings begin rooting within three to eight weeks. Warmth, bright indirect light and the health of the original cutting can significantly affect the timeline.
Can a rubber plant grow from a single leaf?
A leaf may develop roots, but it usually will not become a complete plant without a node. Include a small section of stem containing a node for successful propagation.
Is it better to propagate a rubber plant in water or soil?
Both methods can work effectively. Water makes root development visible, while soil allows the roots to form directly in the environment where the new plant will continue growing.
Where should I cut a rubber plant for propagation?
Make the lower cut just beneath a healthy node on the stem. The finished cutting should contain at least one node and one healthy leaf.