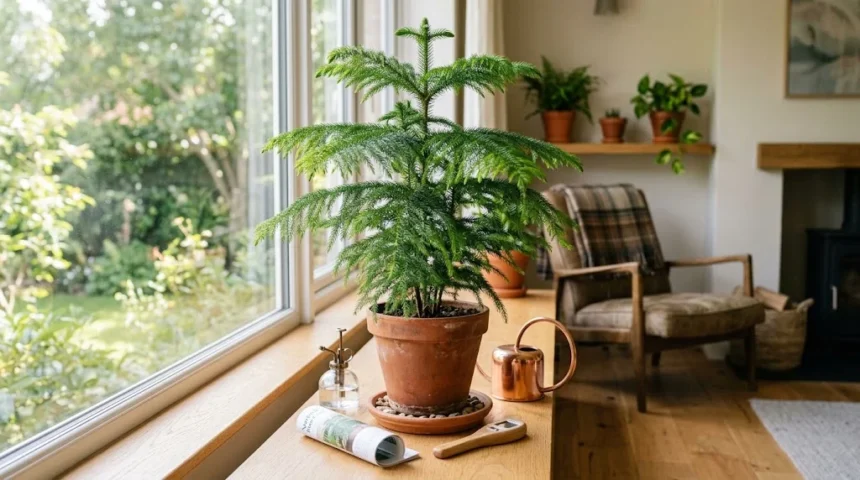
Norfolk pine care can feel surprisingly different from caring for ordinary indoor houseplants, especially when you first bring one into your home. Despite its common name, the Norfolk Island pine is not a true pine and naturally comes from a warm, subtropical island environment. That background explains why it prefers bright light, steady moisture, comfortable temperatures, and noticeably higher humidity than many homes naturally provide. When these basic conditions are balanced, the plant can remain attractive, symmetrical, and richly green for many years. Problems usually begin when watering becomes inconsistent, indoor air becomes extremely dry, or light levels drop too far. Understanding those needs makes indoor Norfolk pine care much easier than it initially appears.
Many people buy Norfolk Island pines during the holiday season because their layered branches resemble miniature Christmas trees, but these plants deserve year-round attention. A healthy specimen develops soft, feathery foliage arranged along evenly spaced branches that create its distinctive architectural appearance. Indoors, growth is usually slower and more manageable than it would be in the plant’s natural outdoor environment. Your goal is therefore not to force rapid growth but to maintain stable conditions that support healthy roots, flexible green branches, and balanced development. This guide covers watering, indoor light, humidity, soil, fertilizing, pruning, repotting, and common Norfolk pine problems. With the right routine, this elegant evergreen-style houseplant can become a long-term feature of your indoor plant collection.
Understanding Norfolk Pine Care Before You Start
Norfolk Island pine, botanically known as Araucaria heterophylla, originates from Norfolk Island in the South Pacific, where environmental conditions are considerably different from most indoor spaces. Its natural habitat offers mild temperatures, abundant atmospheric moisture, and plenty of bright sunlight throughout much of the year. Those conditions explain why Norfolk pine indoor care should focus more on consistency than on complicated gardening techniques. The plant generally dislikes sudden changes in temperature, extreme dryness, prolonged drought, and poorly draining soil. When gardeners understand its tropical and subtropical background, many seemingly mysterious symptoms become easier to diagnose. Brown needles, drooping branches, or slow growth often indicate environmental stress rather than a serious disease.
Although Norfolk Island pine resembles familiar conifer trees, treating it exactly like a traditional outdoor pine can cause unnecessary problems. It does not appreciate cold winter conditions that many true pine species tolerate without difficulty. Instead, temperatures normally found in comfortable homes usually suit it well, provided the plant is protected from intense heating vents and freezing drafts. Its roots also prefer slightly moist soil instead of repeatedly drying completely between waterings. At the same time, constantly saturated potting mix can quickly deprive roots of oxygen and encourage root rot. Successful Norfolk pine care therefore depends on maintaining a middle ground between excessive dryness and excessive moisture. Consistency is more important than following a rigid calendar.
Indoor Norfolk pines can grow slowly but steadily when given enough light and sufficient root space. Young plants may remain compact for several years, while mature specimens can eventually become impressive floor plants that require considerably more vertical room. Their natural symmetry is one of their greatest ornamental features, so choosing an appropriate location early can reduce the need for corrective pruning later. Rotating the pot periodically also encourages more even exposure to available sunlight. Without rotation, branches facing the window may grow more strongly while the shaded side becomes thinner or begins leaning toward the light. Balanced light helps preserve the attractive layered structure people associate with healthy Norfolk Island pine growth. It also reduces stress on the central trunk.
Another important feature of Norfolk pine care is learning how slowly these plants respond to environmental changes. A watering mistake made today may not create obvious brown foliage immediately, and improved conditions may require several weeks before visible recovery begins. This slower response can tempt owners to make too many adjustments at once, including changing location, increasing fertilizer, watering heavily, and repotting simultaneously. Multiple changes make it harder to determine what the plant actually needed and can create additional stress. Instead, observe soil moisture, lighting conditions, temperature, humidity, and foliage carefully before making major corrections. Adjust the most likely cause first and allow the plant time to respond. Patient observation is one of the most valuable indoor plant care skills.
Norfolk pine can also fit naturally into a broader indoor and outdoor gardening routine when you understand how different plants require different conditions. For example, acid-loving flowering shrubs have very different pruning, soil, and planting requirements from this subtropical indoor tree. If you are expanding your gardening knowledge beyond houseplants, this detailed rhododendron care guide explains planting, pruning, and blooming practices for another popular ornamental plant. Comparing plant requirements can help gardeners avoid applying one universal care routine to everything they grow. Norfolk Island pine thrives when its individual needs guide your decisions rather than general assumptions about evergreen plants. That plant-specific approach creates healthier growth and fewer preventable problems over time.
Give Your Norfolk Pine the Right Indoor Light
Bright indirect light is generally the safest starting point for growing a Norfolk Island pine indoors. A position close to a bright east-, west-, or lightly filtered south-facing window can provide enough energy without exposing the foliage to sudden extreme conditions. Norfolk pines can tolerate some direct sunlight, particularly gentle morning sun, when they have been gradually accustomed to it. However, moving a plant directly from a dim store environment into intense afternoon sunlight may cause stress or foliage damage. Gradual acclimation allows the plant to adjust more comfortably to stronger exposure. Light is especially important for maintaining dense branches and healthy green color. Poor lighting is one of the most common reasons indoor Norfolk pines gradually lose their attractive shape.
When a Norfolk pine receives insufficient light, growth may become weak, sparse, or uneven. Lower branches can gradually deteriorate while the upper portion stretches toward the brightest available window. Because lost lower branches generally do not regenerate into the same perfectly symmetrical structure, preventing excessive shade is better than trying to repair the plant afterward. Move the plant closer to a bright window if you notice persistent leaning or thinning foliage. During darker winter months, even a location that works well in summer may become noticeably dimmer. Seasonal changes in daylight therefore deserve consideration when choosing an indoor growing position. Supplemental grow lighting can also help in homes where natural window light is consistently limited. The goal is steady illumination rather than harsh exposure.
Window direction can make a significant difference in Norfolk pine indoor growing conditions. East-facing windows provide gentle morning sunlight that is usually easy for the plant to tolerate, while south-facing windows often offer the strongest overall light. West-facing locations can work well but may deliver intense afternoon heat during warmer months, particularly through large unshaded glass. North-facing windows may be sufficient only when they are exceptionally bright and unobstructed. Buildings, trees, curtains, and tinted glass can dramatically reduce the amount of useful light actually reaching foliage. Instead of judging exposure only by window direction, observe how bright the location remains throughout the day. A bright room does not automatically mean your plant is receiving enough usable light several feet away from the window.
Regularly rotating your Norfolk pine helps prevent one-sided growth caused by directional indoor light. Turning the container approximately one-quarter turn every week or two allows different sides of the canopy to face the window over time. This simple practice encourages a more balanced silhouette and can reduce noticeable leaning of the central leader. Rotation is especially useful for plants positioned against walls, where most usable light arrives from only one direction. However, avoid constantly moving the plant between completely different environments, because Norfolk pines generally perform best when conditions remain relatively stable. A small rotation within the same location is much less stressful than repeatedly relocating the pot. Consistent placement combined with gentle rotation usually produces the most attractive indoor form.
Artificial grow lights can provide valuable support when winter days are short or indoor architecture limits natural sunlight. A full-spectrum LED grow light positioned appropriately above the plant can supplement window exposure without dramatically increasing room temperature. Follow the manufacturer’s recommended distance because lights positioned too far away may provide little benefit, while very powerful fixtures placed too close can stress foliage. Supplemental lighting should imitate a normal day-night cycle rather than remaining switched on continuously. Norfolk Island pine still benefits from a regular dark period each night. Grow lights are particularly useful for offices, apartments, basements, and rooms with heavily shaded windows. They can also help prevent seasonal decline when available daylight drops sharply during winter.
How to Water a Norfolk Pine Correctly
Watering is one of the most important parts of Norfolk pine care because both prolonged dryness and constantly wet soil can create serious problems. The best approach is to check the potting mix rather than automatically watering on a fixed weekly schedule. Feel the upper layer of soil with your finger and water when the top inch or so begins to feel slightly dry. The deeper root zone should still retain some moisture rather than becoming completely parched. Water thoroughly enough for excess moisture to move through the drainage holes at the bottom of the container. This encourages more complete root hydration than repeatedly adding tiny amounts of water. After watering, empty standing water from decorative saucers or outer cachepots.
The frequency of Norfolk pine watering naturally changes throughout the year because environmental conditions influence how quickly soil loses moisture. During brighter spring and summer periods, active growth and warmer temperatures may cause the potting mix to dry faster. Winter usually brings slower growth, weaker sunlight, and lower evaporation, meaning the plant may need water less frequently. Large plants in relatively small containers can also dry more quickly than small plants in generously sized pots. Air conditioning, central heating, humidity, soil composition, and container material all influence watering intervals. For these reasons, advice such as watering exactly once every seven days should be treated cautiously. Checking actual soil conditions provides a much more reliable watering guide.
Signs of underwatering may include dry potting mix, limp branch tips, crispy foliage, or browning that gradually progresses when drought continues. A severely dry root ball can sometimes become difficult to rehydrate because water runs quickly around the sides instead of penetrating the center. When this happens, apply water slowly in several passes until the soil absorbs moisture evenly and excess begins draining normally. Avoid compensating for previous drought by leaving the plant sitting permanently in water afterward. Roots need both water and air, so restoring normal moisture balance is the objective. Preventing repeated extreme drying is considerably easier than trying to revive heavily desiccated foliage. Damaged brown tissue usually does not become green again even after watering improves.
Overwatering can be equally damaging and may initially look confusing because stressed roots cannot supply the foliage effectively. Persistently saturated soil reduces available oxygen around roots and creates conditions favorable to root decay. Warning signs can include yellowing foliage, widespread branch decline, unpleasant-smelling soil, soft roots, or soil that remains wet for unusually long periods. If the pot lacks drainage holes, move the plant into a suitable container before serious root problems develop. When root rot is suspected, carefully inspect the roots and remove severely decayed material before repotting into fresh, well-draining mix. Afterward, adjust watering rather than keeping the new soil continuously wet. Healthy Norfolk pine roots require a repeating cycle of moisture followed by gentle partial drying.
Water quality can occasionally affect sensitive Norfolk pines, especially when tap water contains high levels of dissolved minerals or salts. Repeated mineral accumulation may contribute to brown tips or visible crust on the potting soil, although humidity and watering stress are also common causes. If your local water is particularly hard, filtered water, collected rainwater, or another low-mineral source may be worth trying. Occasionally flushing the potting mix thoroughly can also help remove accumulated fertilizer salts when drainage is excellent. Always allow excess water to escape freely after flushing the container. Room-temperature water is generally preferable to extremely cold water taken directly from a cold supply. Maintaining a simple, consistent watering routine usually produces better results than frequently switching methods.
Choose the Best Soil, Pot and Drainage Setup
A healthy Norfolk pine root system needs potting mix that retains useful moisture while still allowing excess water to drain efficiently. Standard quality houseplant potting soil can work when its structure remains loose and airy, particularly when amended with drainage-supporting materials where necessary. Heavy garden soil should not be used directly in indoor containers because it often compacts and drains poorly. Compacted soil creates pockets with limited oxygen and can remain wet around sensitive roots for extended periods. A slightly acidic to near-neutral growing medium is generally suitable for Norfolk Island pine. The exact commercial soil brand matters less than good structure, drainage, and moisture management. Fresh potting mix also supports stronger root development when repotting becomes necessary.
Container choice is equally important because even excellent soil performs poorly inside a pot that cannot release excess water. Always choose a planter with functional drainage holes rather than relying entirely on careful watering to prevent saturation. Decorative pots without drainage can still be used as outer cachepots if the plant remains inside a separate draining nursery container. After watering, remove any accumulated water from the outer pot so the roots are not left soaking. Terra-cotta containers dry more quickly because moisture can evaporate through their porous walls, while plastic and glazed ceramic generally retain moisture longer. Consider your home environment and watering habits when selecting pot material. There is no single perfect container as long as moisture can be managed safely.
Avoid moving a Norfolk pine into an excessively large pot because oversized containers hold considerably more wet soil around a relatively small root system. That extra moisture may remain unused for long periods and increase the risk of root problems. When repotting, moving up only one modest pot size is usually sufficient. A container roughly a few centimeters wider than the current pot provides fresh growing space without dramatically changing moisture behavior. Mature Norfolk pines may become top-heavy, so stability becomes increasingly important as height increases. A heavier container can help prevent tall plants from tipping while still providing drainage. The pot should support both healthy roots and the physical structure of the plant.
Repotting is generally needed when roots become noticeably crowded, growth slows because the container is restrictive, or water begins behaving unusually in compacted old soil. Norfolk pines do not usually require frequent repotting, and unnecessarily disturbing healthy roots every year provides little benefit. Spring is often a convenient time because increasing light supports renewed growth after the plant adjusts. Watering the plant normally before repotting can make the root ball easier to handle without crumbling excessively. Remove the plant carefully and avoid aggressively breaking apart healthy roots unless serious compaction or root disease requires intervention. Position it at approximately the same soil depth as before rather than burying the trunk deeper. Water afterward and return the plant to stable light conditions.
The soil surface can also provide useful clues about whether your growing setup needs attention. A hard crust may indicate accumulated minerals, compacted mix, or repeated shallow watering, while soil that pulls completely away from the pot edges often indicates severe drying. Fungus gnats may appear when potting soil remains persistently wet, particularly when organic material stays damp near the surface. These insects are usually more annoying than dangerous, but their presence can signal that watering habits deserve review. Improve drainage, allow appropriate partial drying, and avoid routinely leaving water inside saucers. Healthy soil should feel slightly springy and absorb water reasonably evenly rather than becoming permanently muddy or brick-hard. Root-zone management is the foundation of reliable Norfolk pine growth.
Maintain Comfortable Temperature and Humidity
Norfolk Island pine prefers relatively stable indoor temperatures rather than dramatic seasonal extremes. Most comfortable household temperatures generally fall within a suitable range, particularly when the plant remains away from freezing windows or intense sources of heat. Sudden exposure to cold drafts can stress foliage, while hot air directly from heating vents can dry branches surprisingly quickly. Avoid placing the plant immediately beside radiators, fireplaces, forced-air vents, or frequently opened exterior doors during winter. Temperature stability becomes especially important when indoor humidity is already low. A location that feels comfortable to people is often suitable, provided air movement is not excessively hot or cold. Protecting the plant from sudden environmental swings supports more consistent foliage quality.
Humidity is frequently the overlooked part of Norfolk pine indoor care. These plants come from an environment where atmospheric moisture is naturally higher than the air inside many climate-controlled homes. When indoor humidity becomes extremely low, foliage tips may turn brown and branchlets can develop a dry, brittle appearance. Central heating during winter commonly creates the biggest challenge because heated air can become exceptionally dry. A room humidifier is one of the most effective ways to raise humidity consistently around the plant. Grouping compatible houseplants together may also create a slightly more humid microclimate through collective moisture release. Maintaining moderate humidity is generally more useful than occasionally misting leaves and then allowing the air to become very dry again.
Misting is commonly recommended for Norfolk pine care, but its benefits are often overstated. Light misting can temporarily moisten foliage and may help remove dust, yet it usually changes room humidity for only a short period. If your home regularly falls into very dry humidity levels, a humidifier provides a much more consistent solution. Pebble trays can create limited localized moisture through evaporation, but they should not allow the bottom of the pot to sit directly in water. Whatever method you use, the goal is improving surrounding air moisture without keeping soil permanently saturated. Good airflow should also remain present to discourage fungal issues. Humidity and watering should be managed separately because wet soil cannot compensate for excessively dry air.
Bathrooms can sometimes provide suitable Norfolk pine humidity, but only when they also receive enough natural or supplemental light. A humid room with very poor lighting will not provide balanced growing conditions. Kitchens may also offer somewhat higher moisture levels, although temperature fluctuations and limited floor space can make placement challenging. Bright living rooms with a nearby humidifier often provide a practical combination of light, space, and environmental control. Consider how conditions change across the entire day rather than evaluating a location during only one moment. A sunny window may become extremely hot in the afternoon, while another location may receive cold drafts overnight. The best spot maintains reasonably stable light, temperature, and humidity simultaneously.
Seasonal monitoring becomes especially useful when transitioning between air conditioning and heating periods. A plant that looks excellent throughout summer can suddenly develop brown tips after indoor heating starts, even when your watering schedule has not changed. This does not necessarily mean the plant suddenly needs much more water because the real issue may be atmospheric dryness. Check soil moisture before increasing watering, and measure humidity with a simple hygrometer if conditions are difficult to judge. Likewise, cooler winter temperatures can slow soil drying even while heated air dries the foliage. Understanding these competing factors prevents accidental overwatering. Norfolk pine care becomes far easier when you treat temperature, root moisture, and humidity as related but separate environmental conditions.
Fertilizing, Pruning and Repotting Norfolk Pine
Norfolk pines do not usually require aggressive fertilizing to remain attractive indoors. During active spring and summer growth, a balanced houseplant fertilizer applied at a diluted strength can supply nutrients gradually without overwhelming the root system. Follow product instructions carefully because excessive fertilizer can create harmful salt buildup around roots. Plants growing slowly in lower indoor light generally need less fertilizer than specimens receiving strong light and producing noticeable new growth. Fertilizing repeatedly cannot compensate for poor lighting, damaged roots, or incorrect watering. In fact, feeding a severely stressed plant can make conditions worse by increasing salt concentration in the soil. Correct the environmental problem first and resume feeding only after healthy growth becomes established.
Fertilizer applications can usually be reduced substantially or paused during the darker winter months. Norfolk Island pine growth naturally slows when days become shorter and indoor conditions provide less energy for active development. Continuing strong feeding during this period may leave unused mineral salts accumulating in the potting mix. Resume a gentle feeding schedule when spring light increases and fresh growth becomes visible. Organic or synthetic houseplant fertilizers can both work when used responsibly and at appropriate concentrations. The important factor is avoiding the assumption that more fertilizer automatically creates faster or healthier growth. Moderate feeding combined with excellent light and proper watering is far more effective. Healthy roots use nutrients efficiently when the entire growing environment is balanced.
Pruning a Norfolk pine requires restraint because its natural architecture is difficult to rebuild once major branches are removed. Avoid cutting the central growing tip unless absolutely necessary because damaging the leader can permanently alter the plant’s symmetrical form. Completely brown or dead lower branches can be removed with clean pruning tools, but healthy green branches should generally remain intact. Trimming individual branch tips can create uneven growth because the plant does not respond exactly like a conventional hedge or shrub. If the plant is becoming too large for its space, moving it to a larger room is often preferable to heavy pruning. Plan for eventual height when choosing an indoor location. Preserving the central leader helps maintain the characteristic Norfolk pine shape.
Some lower branch loss can occur naturally as plants age, but rapid or widespread decline usually indicates environmental stress. Before removing branches, determine whether insufficient light, repeated drought, overwatering, dry air, or temperature fluctuations contributed to the damage. Pruning away symptoms without correcting the cause will not prevent additional branches from deteriorating. Use sharp, clean scissors or pruners and make neat cuts close to the trunk without damaging surrounding healthy tissue. Do not remove large amounts of foliage at one time unless the material is completely dead. Green foliage contributes energy through photosynthesis and supports overall plant recovery. Correcting care conditions usually does more for appearance than aggressive shaping. Norfolk pines generally look best when their natural structure is respected.
Repotting and fertilizing should also be coordinated carefully because newly refreshed potting mix may already contain nutrients. Immediately applying strong fertilizer after repotting can expose recovering roots to unnecessary mineral concentrations. Allow the plant to settle into its new container and follow the recommendations associated with your chosen potting mix. During this adjustment period, maintain steady light, appropriate moisture, and moderate humidity instead of trying to accelerate growth. Some temporary slowing after repotting can occur because roots are adapting to their new environment. Avoid repeatedly moving the plant or changing watering dramatically during this period. Once active growth resumes, gradually return to your normal feeding routine. Gentle aftercare helps reduce transplant stress and promotes stronger long-term establishment.
Common Norfolk Pine Problems and What They Mean
Brown tips are among the most frequently reported Norfolk pine problems, but they can have several possible causes. Very dry indoor air, inconsistent watering, mineral accumulation, root stress, and exposure to hot drafts may all contribute. Start by checking the potting soil because both severe dryness and prolonged saturation can create foliage damage. Next, consider whether heating or air conditioning equipment is blowing directly toward the plant. If soil moisture seems appropriate, evaluate humidity and water quality before making additional changes. Avoid cutting into healthy green foliage simply to remove every slightly brown tip because unnecessary trimming can affect appearance further. Identifying the underlying environmental cause gives you a much better chance of preventing continued browning.
Yellowing foliage often suggests that the roots or growing environment are experiencing stress. Soil that remains wet for many days deserves immediate attention because excess moisture can reduce oxygen around roots. Check that drainage holes are open and that the container is not sitting inside accumulated water. If the soil smells unpleasant or roots appear dark, soft, and decayed, root rot may already be developing. Conversely, yellowing combined with extremely dry soil could indicate prolonged dehydration rather than overwatering. Lighting should also be evaluated because severe shade can weaken lower foliage over time. Diagnosis works best when several clues are considered together. Avoid assuming every yellow needle means the plant simply needs more fertilizer.
Drooping branches can occur when a Norfolk pine becomes excessively dry, but they may also reflect significant root damage or environmental shock. Check moisture before immediately watering because adding more water to already saturated soil could worsen root problems. If the mix is genuinely dry, water thoroughly and allow excess moisture to drain away. A recently relocated plant may also react to sudden changes in light, temperature, or humidity. Give it time to adjust once suitable conditions have been restored instead of continuously moving it around the home. Branches that remain green may recover some firmness as the plant stabilizes. Completely brown or brittle branches, however, are unlikely to return to their original condition and can eventually be removed.
Pests are not the most common Norfolk pine problem, but spider mites, mealybugs, scale insects, and other houseplant pests can occasionally appear. Spider mites become particularly troublesome in warm, dry indoor environments and may produce fine webbing around foliage. Mealybugs often appear as small cottony clusters, while scale insects can resemble attached brown or tan bumps. Inspect branches and leaf surfaces regularly, especially when bringing new houseplants into the same room. Early detection makes infestations much easier to control before pests spread throughout the plant. Isolate affected plants when practical and choose an appropriate houseplant pest treatment based on the specific insect identified. Improving overall plant health also helps reduce vulnerability to recurring infestations.
Branch loss concentrated on one side of the plant can indicate uneven lighting rather than a root or watering problem. If one side consistently faces a wall while the other faces a bright window, growth will naturally favor the brighter direction. Gentle periodic rotation can reduce future imbalance, although branches already lost will not necessarily regrow in the same positions. Sudden lower branch decline may also occur after prolonged dryness or repeated environmental stress. Keep records of watering dates if you find it difficult to recognize patterns. Photographs taken every few weeks can also help reveal gradual changes that are easy to overlook day to day. Troubleshooting Norfolk pine care becomes much easier when observations are systematic rather than based on a single symptom.
Seasonal Norfolk Pine Care Throughout the Year
Spring is an important period for Norfolk pine care because increasing daylight usually encourages renewed growth. Move the plant gradually toward brighter conditions if it spent winter farther from the strongest available window. Begin checking soil moisture more frequently because warmer temperatures and stronger sunlight may increase water use. Spring is also a practical time to repot root-bound plants or refresh compacted potting mix when necessary. Fertilizing can resume gradually once you see active growth rather than automatically starting on a particular calendar date. Inspect branches for winter damage and remove only foliage that is completely dead. These simple spring adjustments prepare the plant for its most active indoor growing period without creating abrupt environmental changes.
Summer generally provides the strongest natural light, but intense heat can create new challenges. A plant near large south- or west-facing glass may experience much higher leaf temperatures than the surrounding room suggests. Watch for foliage bleaching, sudden browning, or soil drying dramatically faster than during spring. If necessary, use a sheer curtain to soften harsh afternoon sunlight while maintaining bright overall conditions. Some growers move Norfolk pines outdoors during warm weather, but the transition must be gradual because direct outdoor sunlight is far stronger than indoor window light. Keep the plant protected from extreme heat and strong wind. Bring it back indoors before nighttime temperatures become unsuitable rather than waiting for cold weather to arrive suddenly.
Autumn is the time to prepare Norfolk Island pine for declining daylight and changing indoor humidity. If the plant spent summer outside, inspect carefully for insects before returning it permanently indoors. Gradually acclimate it to lower indoor light instead of moving immediately from bright outdoor conditions into a dark corner. Growth will begin slowing as available sunlight decreases, so the potting mix may remain moist longer between waterings. Reduce feeding accordingly and avoid maintaining the same summer fertilizer routine automatically. Indoor heating may also begin during autumn, causing humidity to fall even while soil dries more slowly. Monitoring both soil and air conditions separately becomes especially important during this seasonal transition.
Winter can be the most challenging period for indoor Norfolk pine care because reduced daylight often coincides with very dry heated air. Position the plant where it receives the brightest practical natural light without exposing it to freezing drafts from windows or doors. Reduce watering frequency when the soil takes longer to dry, but never allow the root ball to remain completely dry for extended periods. A humidifier can be particularly valuable during this season if household humidity drops substantially. Avoid placing decorative lights or heating devices that produce significant warmth directly against the foliage. Norfolk pines are frequently used as living Christmas trees, but heavy ornaments can bend their flexible branches. Lightweight decorations are much safer for preserving the plant’s natural structure.
Seasonal care becomes easier when you observe changes instead of trying to maintain identical routines throughout all twelve months. The amount of water a Norfolk pine needs in July may be very different from what it requires during January, even in the same location. Fertilizer demand, light intensity, humidity, and evaporation all shift as conditions change. Establishing a habit of checking soil, observing foliage, and noticing room temperature can prevent many common problems before they become severe. Do not interpret seasonal slowing as failure if the plant remains green and structurally healthy. Indoor Norfolk pines often grow modestly rather than continuously producing dramatic new foliage. Consistency across changing seasons is the key to maintaining a healthy specimen for many years.
How to Keep a Norfolk Pine Healthy for Years
Long-term Norfolk pine care is mostly about maintaining stable conditions rather than constantly introducing new products or techniques. Choose a bright location, water according to soil moisture, provide functional drainage, and maintain moderate humidity whenever possible. These basic practices influence plant health far more than complicated supplements or frequent pruning. A Norfolk pine that has adapted successfully to one location usually benefits from remaining there rather than being moved repeatedly around the home. Watch how the plant responds over several weeks before making major care changes. New growth and flexible green foliage generally indicate that your routine is working. Consistency allows the plant to invest its energy in steady roots and balanced canopy development.
Regular observation can prevent small problems from becoming difficult ones. Check the soil before watering, inspect branch tips for unusual browning, and occasionally look underneath foliage for pests. Notice whether the plant begins leaning toward the window or losing density on its darker side. These simple observations often reveal care issues long before serious decline occurs. Monthly photographs can be surprisingly useful because gradual changes are difficult to recognize when you see the plant every day. If something changes, review recent environmental conditions before applying fertilizer or pesticides automatically. A sudden heating change, missed watering, or relocation may explain the problem more accurately. Good Norfolk pine care relies on observation before intervention.
Cleaning foliage periodically can also support both appearance and plant function. Dust accumulating on indoor plants can reduce the amount of light reaching leaf surfaces, particularly in homes near busy roads or active construction. Gently rinse the foliage with lukewarm water or wipe accessible areas carefully without bending the delicate branches. Allow excess water to drain fully afterward and return the plant to its usual location. Avoid commercial leaf-shine products unless they are specifically considered suitable for the plant, because Norfolk pine naturally has an attractive soft texture. Cleaning also provides an opportunity to inspect closely for mites, scale, or other pests. Simple maintenance keeps the foliage fresh without interfering with its natural appearance.
As your Norfolk pine becomes larger, planning for space becomes increasingly important. Mature indoor plants may eventually reach ceiling height when given favorable conditions over many years. Since cutting the central leader can damage the characteristic form, it is better to anticipate vertical growth before the plant becomes difficult to accommodate. Rooms with high ceilings, bright stairwells, sunrooms, and spacious living areas can work well for larger specimens. Keep the pot stable and consider container weight if the top growth becomes substantial. Avoid placing the plant where people frequently brush against its branches because repeated physical damage can leave permanent gaps. Giving the plant adequate room allows its elegant layered structure to remain its main decorative feature.
The most successful growers usually develop a routine based on the individual plant rather than trying to follow every care instruction mechanically. Your home’s light, temperature, humidity, potting mix, and container may differ significantly from another person’s conditions. Use general Norfolk pine care recommendations as a framework, then adjust watering frequency and placement according to what you actually observe. Healthy plants should remain mostly green, maintain flexible branches, and produce gradual new growth when conditions are favorable. Occasional minor browning does not necessarily mean the entire care routine has failed. Focus on trends rather than isolated imperfections. With attentive watering, strong indoor light, suitable humidity, and patient maintenance, Norfolk Island pine can remain an impressive houseplant for many years.
FAQs About Norfolk Pine Care
How often should I water a Norfolk pine?
Water when the upper inch of potting mix begins to feel slightly dry while the deeper soil still retains some moisture. The exact frequency changes with season, light, humidity, pot size, and indoor temperature, so check the soil rather than following a fixed schedule.
Why are the tips of my Norfolk pine turning brown?
Brown tips are commonly linked to dry indoor air, inconsistent watering, mineral buildup, temperature stress, or root problems. Check soil moisture and drainage first, then evaluate humidity, heating vents, drafts, and water quality before changing your routine.
Can a Norfolk pine survive in low light?
Norfolk pine can tolerate moderately reduced light for a period, but prolonged low-light conditions often produce weak, sparse, or uneven growth. Bright indirect light is generally better for maintaining healthy green foliage and the plant’s naturally symmetrical shape.
Should I mist my Norfolk pine?
You can mist a Norfolk pine occasionally, but misting usually raises humidity for only a short time. If your home has consistently dry air, especially during winter, a room humidifier provides much more reliable humidity around the plant.
Can I cut the top off a Norfolk pine?
Avoid cutting the central growing tip because doing so may permanently change the plant’s natural symmetrical structure. Remove only dead or severely damaged branches when necessary, and solve space problems through placement rather than aggressive pruning whenever possible.