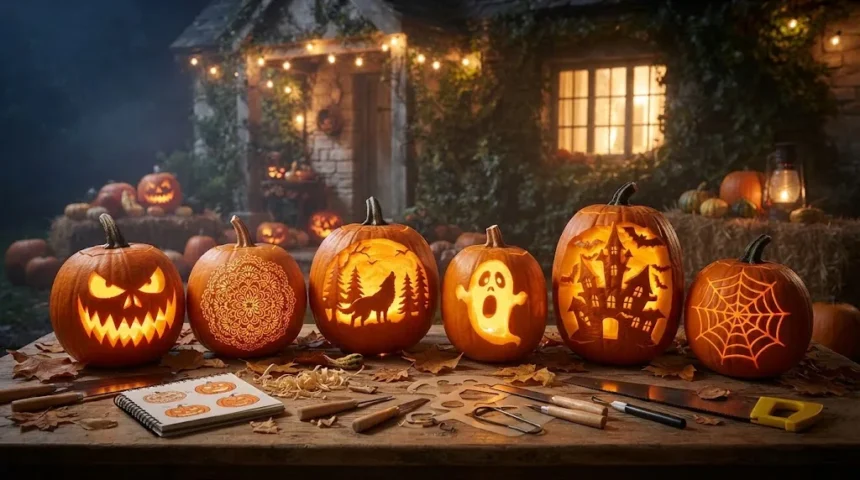
Pumpkin carving is one of the most enjoyable traditions of the fall season. Whether you prefer spooky faces, clean geometric patterns, cute characters, or elegant designs, there are countless ways to turn an ordinary pumpkin into something memorable. The best pumpkin carving inspo combines creativity with simple techniques so the finished result looks impressive without becoming frustrating.
You do not need professional carving skills to create a pumpkin that stands out. Choosing the right pumpkin, preparing it carefully, using suitable tools, and starting with a manageable design can make the entire process easier. This guide covers everything from carving ideas and safety tips to lighting, preservation, and creative ways to display your finished pumpkins.
How to Choose the Best Pumpkin for Carving
Start by looking for a pumpkin with a smooth, firm surface and a shape that suits your intended design. Flat areas are easier to sketch and carve, especially when you are working with detailed faces, lettering, or symmetrical patterns. Avoid pumpkins with soft spots, deep bruises, or obvious signs of mold because they may deteriorate quickly.
Size matters too. Large pumpkins provide more room for complicated designs, while medium pumpkins are often easier to handle and carve. Small pumpkins can work well for simple faces, stars, moons, or decorative patterns, but their thicker walls may sometimes make detailed carving more difficult.
Also check the stem before buying. A firm, intact stem can indicate that the pumpkin was handled carefully, while a damaged stem may shorten its display life. Never carry the pumpkin by the stem because it can break off and create an opening where moisture and decay can develop.
Essential Pumpkin Carving Tools
A basic pumpkin carving kit can handle most designs. Small serrated carving saws, scoops, poking tools, and pattern transfer tools are especially useful because they provide more control than large kitchen knives. Their smaller size also makes it easier to work around corners and create cleaner shapes.
A sturdy spoon or pumpkin scraper helps remove seeds and stringy pulp from the inside. For detailed designs, consider using small craft tools designed specifically for pumpkin carving. Fine tools allow you to remove thin sections of the pumpkin skin without cutting completely through the wall.
Keep paper towels, washable markers, tape, and a bowl nearby while you work. The bowl gives you somewhere to place seeds and pulp, while the marker allows you to adjust the design before making permanent cuts. Keeping your workspace organized also makes the entire carving process safer and more enjoyable.
Easy Pumpkin Carving Ideas for Beginners
Beginners should start with simple shapes that do not require many tight corners. Classic triangle eyes, rounded mouths, stars, moons, hearts, and basic ghost shapes are easier to carve than highly detailed images. These designs can still look impressive once the pumpkin is illuminated at night.
Another simple approach is using repeated shapes. Carving several circles, diamonds, or small triangles across the pumpkin creates a patterned lantern effect without requiring artistic drawing skills. You can vary the spacing and size of the shapes to give the design more personality.
If you need broader seasonal inspiration before selecting a pattern, explore these pumpkin ideas to see how carving can fit into a larger fall display. Matching your carved pumpkin with the surrounding decor can make even a simple design feel much more intentional.
Spooky Pumpkin Carving Ideas
Classic scary faces remain popular because they are easy to personalize. Try narrow eyes, sharp teeth, crooked smiles, or exaggerated eyebrows to create a creepy expression. Small changes in the shape of the mouth or eyes can make the face look funny, angry, frightened, or sinister.
Silhouette designs can create a more dramatic effect. Bats, haunted houses, witches, ravens, spiders, and graveyard scenes become especially striking once light shines through the carved areas. These patterns can range from very simple outlines to detailed scenes depending on your experience.
Another spooky option is to use several pumpkins together as one display. One pumpkin might feature a ghost, another a bat, and a third a monster face. Grouping different designs creates a stronger Halloween atmosphere than relying on a single carved pumpkin by itself.
Cute Pumpkin Carving Ideas
Pumpkin carving does not have to be scary. Cute designs such as cats, owls, friendly ghosts, smiling faces, stars, and cartoon-inspired expressions can create a playful look. These ideas work especially well for family decorating, front porches, and homes with younger children.
Simple animal faces are another fun option. Rounded eyes, small noses, and basic ears can transform pumpkins into cats, bears, foxes, or rabbits. You can also use small pieces of pumpkin skin or safe decorative accessories to add extra detail without complicated cutting.
Consider carving pumpkins with different facial expressions and arranging them together like a group of characters. One can look surprised, another sleepy, and another cheerful. This creates a display with personality while keeping each individual carving relatively easy to complete.
Creative Pumpkin Carving Patterns
Geometric patterns are an excellent choice when you want something modern. Triangles, circles, diamonds, lines, and repeating shapes can create attractive light patterns once the pumpkin is illuminated. These designs often look more sophisticated than traditional faces while still being relatively simple to carve.
Nature-inspired patterns are another popular option. Leaves, trees, flowers, vines, stars, and crescent moons work beautifully on pumpkins because their organic shapes complement the natural surface. You can carve completely through certain areas and lightly shave others to create different levels of brightness.
Abstract designs allow even more freedom. Instead of copying a specific image, create waves, swirls, irregular holes, or freehand patterns around the pumpkin. There is no need for perfect symmetry, so this style is ideal when you want a creative result without following a detailed template.
How to Transfer a Pumpkin Carving Design
Start by printing or drawing the pattern you want to use. Tape the paper firmly against the pumpkin, adjusting it around the curved surface so the main design remains visible. Avoid stretching the paper too tightly because this can distort the proportions of the image.
Use a poking tool or thin skewer to make small holes along the outline. Keep the holes relatively close together around curves and detailed areas. Once the entire design has been transferred, remove the paper and use a washable marker to connect the dots if the outline is difficult to see.
Another option is drawing directly on the pumpkin with a washable marker. This method is faster when you are comfortable sketching freehand and makes last-minute adjustments easy. Always check the entire design before cutting so you can correct uneven shapes or awkward spacing.
How to Carve a Pumpkin Step by Step
Begin by cutting an opening around the stem or through the bottom of the pumpkin. A bottom opening can make it easier to place the pumpkin over a battery-powered light afterward. Whichever method you choose, make the opening large enough for your hand to comfortably reach inside.
Remove the seeds and stringy pulp using a scoop or large spoon. Scrape the inner wall behind your design until it is reasonably smooth and easier to cut. Do not make the wall extremely thin, because delicate areas may crack or collapse during carving.
Follow your transferred pattern and cut slowly using small sawing motions. Start with interior details before removing larger sections because the pumpkin becomes weaker as more material is removed. Push carved pieces out gently rather than forcing them, especially around narrow bridges of pumpkin flesh.
How to Make Detailed Carvings Look Better
Detailed pumpkin carving depends more on patience than force. Work on one small section at a time and avoid rushing through corners or narrow lines. Small carving tools usually provide better control and reduce the risk of accidentally cutting away important parts of the design.
Try using different carving depths to create shading. Removing only the outer skin allows some light to glow through without creating a full opening. Combining shallow scraping with complete cutouts can give faces, landscapes, and patterns more depth and visual interest.
Check your progress by placing a light inside the pumpkin periodically. Areas that look subtle during daylight may appear completely different once illuminated. Testing the design early gives you time to enlarge openings or deepen shaded sections before the pumpkin becomes too fragile.
Pumpkin Carving Safety Tips
Always work on a stable, dry surface with good lighting. Keep tools pointed away from your hands and body, and use small controlled motions rather than applying excessive force. A tool that becomes stuck should be gently worked free instead of being pulled suddenly.
Children should be involved according to their age and ability. Younger children can scoop seeds, draw faces, or select designs while an adult handles sharp carving tools. Older children may use safer pumpkin carving kits with appropriate supervision rather than large kitchen knives.
Battery-operated lights are usually a practical option for illuminating carved pumpkins. They reduce the risks associated with open flames and can be used around many porch displays more comfortably. Whatever lighting you use, keep pumpkins away from flammable fabrics, dried decorations, and crowded walkways.
How to Keep a Carved Pumpkin Fresh Longer
Carved pumpkins naturally begin drying out after they are opened. Removing as much stringy pulp as possible can help slow deterioration because wet material encourages decay. After carving, gently wipe excess moisture from the inside and around the cut edges.
Keep the pumpkin somewhere cool and shaded whenever possible. Direct sunlight and warm temperatures speed up dehydration and softening. If the weather is unusually warm, consider displaying the pumpkin only during the evening rather than leaving it outside all day.
Check the pumpkin regularly for soft areas or mold. Once it becomes heavily decayed, it should be removed from the display. Carving closer to the date you want to showcase the pumpkin is often the simplest way to ensure it still looks fresh when guests arrive.
Best Ways to Light Carved Pumpkins
Lighting can completely change how a carved design looks. Small battery-operated candles create a warm flickering effect that works well for traditional jack-o’-lanterns. They are easy to switch on and off and come in different brightness levels for various pumpkin sizes.
String lights can create a brighter and more even glow. Place a short battery-powered strand loosely inside the pumpkin so light reaches several carved areas. This technique works especially well for patterns with many small holes or designs that wrap around multiple sides.
You can also experiment with different light positions. Placing the light near the back can emphasize front carvings, while lighting from the center creates a more balanced effect. Test the pumpkin in a dark room before displaying it so you can adjust brightness and placement.
Creative Ways to Display Carved Pumpkins
A carved pumpkin looks more impressive when it is part of a complete display. Group pumpkins in different sizes along porch steps, around a doorway, or beside seasonal plants. Mixing carved and uncarved pumpkins creates visual variety and prevents the arrangement from feeling repetitive.
Use wooden crates, hay bales, baskets, or low stands to create different heights. Elevating some pumpkins makes each design easier to see and adds structure to the arrangement. Leave enough space between them so the light from one pumpkin does not overpower nearby carvings.
Indoor displays can work too, especially with smaller pumpkins and battery-operated lights. Place carved pumpkins on a fireplace hearth, entryway table, or protected windowsill. Keep them away from delicate surfaces and fabrics because moisture can escape from freshly carved pumpkins as they age.
Common Pumpkin Carving Mistakes to Avoid
One common mistake is choosing a design that is too complicated for your experience level. Tiny details and narrow lines are difficult to carve cleanly and can break easily. Starting with a simpler pattern usually leads to a better-looking result and a much more enjoyable carving process.
Another mistake is making large cuts before finishing smaller details. Removing too much pumpkin flesh early weakens the structure and makes delicate areas harder to complete. Work from the smallest interior sections outward so the pumpkin remains stable for as long as possible.
Avoid rushing the preparation stage. Leaving excessive pulp inside, skipping the design transfer, or working with blunt tools can make carving unnecessarily difficult. Spending a few extra minutes cleaning and planning before cutting often saves much more time later.
Conclusion
Pumpkin carving offers endless possibilities for creativity, whether your style is spooky, cute, elegant, or modern. Simple faces, geometric patterns, animal designs, and detailed scenes can all create impressive results when paired with careful preparation. The best pumpkin carving inspo is the idea that matches your skill level and the atmosphere you want to create.
Focus on choosing a healthy pumpkin, using suitable tools, transferring your design carefully, and carving with slow controlled movements. Test the lighting before you finish and make adjustments where needed. Small details such as clean edges and thoughtful placement can make a basic pattern look much more polished.
Most importantly, enjoy the process instead of worrying about perfection. Handmade pumpkins naturally have small differences that give them personality. Whether you carve one pumpkin or create an entire porch display, a little creativity and patience can turn this simple fall tradition into something memorable.
FAQs
What are the easiest pumpkin carving ideas for beginners?
Simple faces, stars, moons, triangles, circles, and ghost shapes are easy starting points. Choose designs with large openings and few narrow details so the pumpkin stays strong while you carve.
What tools are best for pumpkin carving?
Small serrated pumpkin saws, scoops, poking tools, and detail carving tools provide good control. A pumpkin carving kit is often easier to handle than large kitchen knives, especially for smaller patterns.
How can I make my pumpkin carving look more professional?
Transfer your pattern carefully, work slowly, and clean rough edges after carving. Using different carving depths and testing the design with internal lighting can also create a more polished final result.
How long does a carved pumpkin last?
A carved pumpkin may stay attractive for several days, depending on temperature, moisture, and freshness. Cooler conditions and keeping it out of direct sunlight can help slow drying and decay.
Should I cut a pumpkin from the top or bottom?
Either method works. Cutting from the top is traditional, while a bottom opening can make placing the pumpkin over a battery light easier and keeps the stem completely intact.